by playing video games.
OpenCV Object Detection in Games
Real-time Object Detection
Learn how to detect objects inside a game window in real-time using OpenCV.
Links
Grab the code on GitHub: https://github.com/learncodebygaming/opencv_tutorials
In the first three parts of this tutorial series, we learned how to use OpenCV's matchTemplate() to detect objects inside an image. Then in part #4, we learned how to quickly capture screenshots and display them as a video stream inside of an OpenCV window. Now we're ready to combine together everything we've learned so far in order to detect objects in real-time.
We could reuse our WindowCapture class completely unchanged from the last tutorial, but I want to make a few improvements to it. First let's save this class to its own file if you haven't done so already: windowcapture.py.
I'd like to convert the list_window_names() member function into a static method. This is done by adding the @staticmethod decorator above the method definition, and removing self from the parameters. The reason you might want to do this is that it allows us to call this function at any time without first instantiating an object, like this: WindowCapture.list_window_names(). You'll find this to be more convenient. Note that we can only do this because list_window_names() does not reference any class properties.
I've also changed the constructor to accept None for the window_name. When given no window name, we'll have WindowCapture just capture the entire screen. I've found that certain applications return a black screen (Chrome), or do not update after the initial image capture (Firefox), and capturing the entire screen can be a suitable fallback plan in those cases.
# windowcapture.py
import numpy as np
import win32gui, win32ui, win32con


class WindowCapture:

    # properties
    w = 0
    h = 0
    hwnd = None
    cropped_x = 0
    cropped_y = 0
    offset_x = 0
    offset_y = 0

    # constructor
    def __init__(self, window_name=None):

        # find the handle for the window we want to capture.
        # if no window name is given, capture the entire screen
        if window_name is None:
            self.hwnd = win32gui.GetDesktopWindow()
        else:
            self.hwnd = win32gui.FindWindow(None, window_name)
            if not self.hwnd:
                raise Exception('Window not found: {}'.format(window_name))

        # get the window size
        window_rect = win32gui.GetWindowRect(self.hwnd)
        self.w = window_rect[2] - window_rect[0]
        self.h = window_rect[3] - window_rect[1]

        if not window_name is None:
            # account for the window border and titlebar and cut them off
            border_pixels = 8
            titlebar_pixels = 30
            self.w = self.w - (border_pixels * 2)
            self.h = self.h - titlebar_pixels - border_pixels
            self.cropped_x = border_pixels
            self.cropped_y = titlebar_pixels

            # set the cropped coordinates offset so we can translate screenshot
            # images into actual screen positions
            self.offset_x = window_rect[0] + self.cropped_x
            self.offset_y = window_rect[1] + self.cropped_y

    def get_screenshot(self):

        # get the window image data
        wDC = win32gui.GetWindowDC(self.hwnd)
        dcObj = win32ui.CreateDCFromHandle(wDC)
        cDC = dcObj.CreateCompatibleDC()
        dataBitMap = win32ui.CreateBitmap()
        dataBitMap.CreateCompatibleBitmap(dcObj, self.w, self.h)
        cDC.SelectObject(dataBitMap)
        cDC.BitBlt((0, 0), (self.w, self.h), dcObj, (self.cropped_x, self.cropped_y), win32con.SRCCOPY)

        # convert the raw data into a format opencv can read
        #dataBitMap.SaveBitmapFile(cDC, 'debug.bmp')
        signedIntsArray = dataBitMap.GetBitmapBits(True)
        img = np.fromstring(signedIntsArray, dtype='uint8')
        img.shape = (self.h, self.w, 4)

        # free resources
        dcObj.DeleteDC()
        cDC.DeleteDC()
        win32gui.ReleaseDC(self.hwnd, wDC)
        win32gui.DeleteObject(dataBitMap.GetHandle())

        # drop the alpha channel, or cv.matchTemplate() will throw an error like:
        #   error: (-215:Assertion failed) (depth == CV_8U || depth == CV_32F) && type == _templ.type()
        #   && _img.dims() <= 2 in function 'cv::matchTemplate'
        img = img[...,:3]

        # make image C_CONTIGUOUS to avoid errors that look like:
        #   File ... in draw_rectangles
        #   TypeError: an integer is required (got type tuple)
        # see the discussion here:
        # https://github.com/opencv/opencv/issues/14866#issuecomment-580207109
        img = np.ascontiguousarray(img)

        return img

    # find the name of the window you're interested in.
    # once you have it, update window_capture()
    # https://stackoverflow.com/questions/55547940/how-to-get-a-list-of-the-name-of-every-open-window
    @staticmethod
    def list_window_names():
        def winEnumHandler(hwnd, ctx):
            if win32gui.IsWindowVisible(hwnd):
                print(hex(hwnd), win32gui.GetWindowText(hwnd))
        win32gui.EnumWindows(winEnumHandler, None)

    # translate a pixel position on a screenshot image to a pixel position on the screen.
    # pos = (x, y)
    # WARNING: if you move the window being captured after execution is started, this will
    # return incorrect coordinates, because the window position is only calculated in
    # the __init__ constructor.
    def get_screen_position(self, pos):
        return (pos[0] + self.offset_x, pos[1] + self.offset_y)
Let's also save our findClickPositions() function to its own file. I've called mine vision.py.
A few alterations need to be made to findClickPositions(). This function will now be processing an OpenCV image returned by WindowCapture instead of reading an image from a file. To account for this, we'll change the second parameter from haystack_img_path to just haystack_img, and we'll remove the cv.imread() call. In the debugger portion of this function, we'll also want to remove cv.waitKey(), as this is now handled in our main loop (as covered in part #4). That same block of code should also no longer fall under the if needle found conditional, because we want to update the image stream with cv.imshow() even when no matches are found.
# vision.py
import cv2 as cv
import numpy as np


def findClickPositions(needle_img_path, haystack_img, threshold=0.5, debug_mode=None):

    # https://docs.opencv.org/4.2.0/d4/da8/group__imgcodecs.html
    #haystack_img = cv.imread(haystack_img_path, cv.IMREAD_UNCHANGED)
    needle_img = cv.imread(needle_img_path, cv.IMREAD_UNCHANGED)
    # Save the dimensions of the needle image
    needle_w = needle_img.shape[1]
    needle_h = needle_img.shape[0]

    # There are 6 methods to choose from:
    # TM_CCOEFF, TM_CCOEFF_NORMED, TM_CCORR, TM_CCORR_NORMED, TM_SQDIFF, TM_SQDIFF_NORMED
    method = cv.TM_CCOEFF_NORMED
    result = cv.matchTemplate(haystack_img, needle_img, method)

    # Get the all the positions from the match result that exceed our threshold
    locations = np.where(result >= threshold)
    locations = list(zip(*locations[::-1]))
    #print(locations)

    # You'll notice a lot of overlapping rectangles get drawn. We can eliminate those redundant
    # locations by using groupRectangles().
    # First we need to create the list of [x, y, w, h] rectangles
    rectangles = []
    for loc in locations:
        rect = [int(loc[0]), int(loc[1]), needle_w, needle_h]
        # Add every box to the list twice in order to retain single (non-overlapping) boxes
        rectangles.append(rect)
        rectangles.append(rect)
    # Apply group rectangles.
    # The groupThreshold parameter should usually be 1. If you put it at 0 then no grouping is
    # done. If you put it at 2 then an object needs at least 3 overlapping rectangles to appear
    # in the result. I've set eps to 0.5, which is:
    # "Relative difference between sides of the rectangles to merge them into a group."
    rectangles, weights = cv.groupRectangles(rectangles, groupThreshold=1, eps=0.5)
    #print(rectangles)

    points = []
    if len(rectangles):
        #print('Found needle.')

        line_color = (0, 255, 0)
        line_type = cv.LINE_4
        marker_color = (255, 0, 255)
        marker_type = cv.MARKER_CROSS

        # Loop over all the rectangles
        for (x, y, w, h) in rectangles:

            # Determine the center position
            center_x = x + int(w/2)
            center_y = y + int(h/2)
            # Save the points
            points.append((center_x, center_y))

            if debug_mode == 'rectangles':
                # Determine the box position
                top_left = (x, y)
                bottom_right = (x + w, y + h)
                # Draw the box
                cv.rectangle(haystack_img, top_left, bottom_right, color=line_color,
                             lineType=line_type, thickness=2)
            elif debug_mode == 'points':
                # Draw the center point
                cv.drawMarker(haystack_img, (center_x, center_y),
                              color=marker_color, markerType=marker_type,
                              markerSize=40, thickness=2)

    if debug_mode:
        cv.imshow('Matches', haystack_img)
        #cv.waitKey()
        #cv.imwrite('result_click_point.jpg', haystack_img)

    return points
Our main.py file will also pick up from where we left off in part #4. We simply need to swap out our cv.imshow() call with a call to findClickPositions() instead.
The first parameter in findClickPositions() is the needle image we want to search for. You'll want to manually take a screenshot and crop out the item you want to match (like we did in part #1). For the second parameter we'll pass in the screenshot returned by WindowCapture's get_screenshot(). Then set your threshold, and enable one of the debug modes.
# main.py
import cv2 as cv
import numpy as np
from time import time
from windowcapture import WindowCapture
from step1_vision import findClickPositions


# initialize the WindowCapture class
wincap = WindowCapture('Albion Online Client')

loop_time = time()
while(True):

    # get an updated image of the game
    screenshot = wincap.get_screenshot()

    # display the processed image
    #cv.imshow('Computer Vision', screenshot)
    points = findClickPositions(
        'albion_limestone.jpg',
        screenshot,
        threshold=0.60,
        debug_mode='rectangles')

    # debug the loop rate
    print('FPS {}'.format(1 / (time() - loop_time)))
    loop_time = time()

    # press 'q' with the output window focused to exit.
    # waits 1 ms every loop to process key presses
    if cv.waitKey(1) == ord('q'):
        cv.destroyAllWindows()
        break

print('Done.')
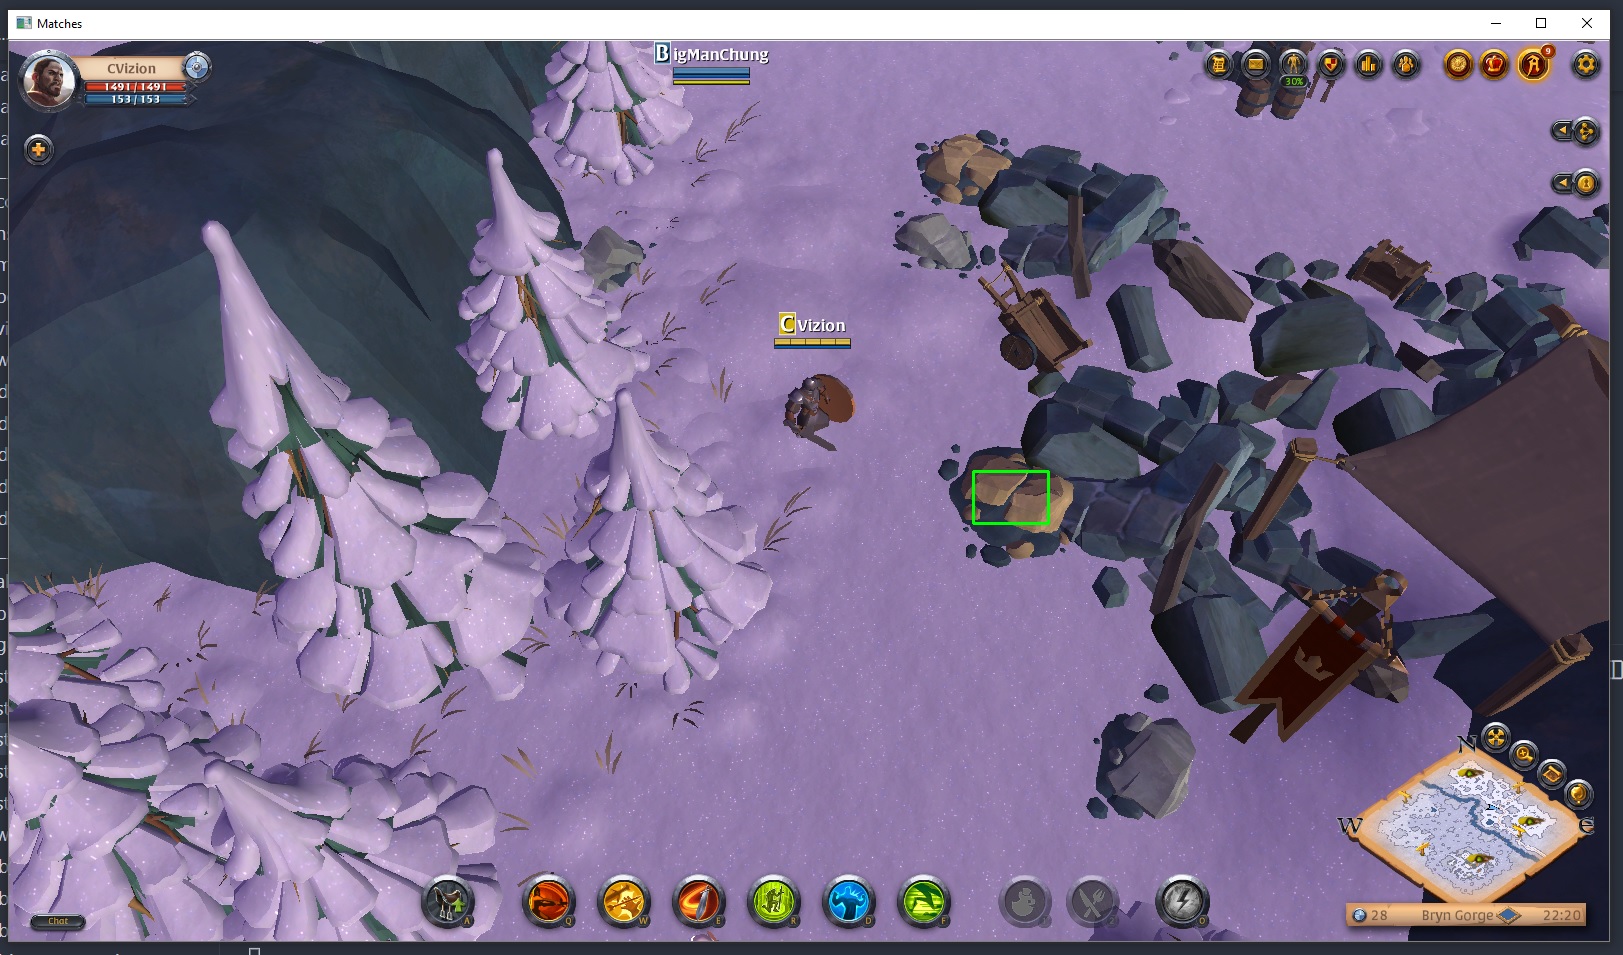
Now when you run main.py with your game client open, you can see your object being detected in the OpenCV window in real-time! Move your character around a bit to test the effectiveness of this detection.
Before we discuss some of the limitations and shortfalls of our object detection, let's first make some improvements to our vision.py code. I want to convert this into a class, to keep everything more organized as we improve upon what we have.
We'll call our new class Vision, and let's read in the needle image in the constructor so that we don't need to repeat that step during every iteration of our main loop. We can also assign our matchTemplate() comparison method here. This will allow us to use different methods for different visions.
class Vision:

    # properties
    needle_img = None
    needle_w = 0
    needle_h = 0
    method = None

    # constructor
    def __init__(self, needle_img_path, method=cv.TM_CCOEFF_NORMED):
        # load the image we're trying to match
        self.needle_img = cv.imread(needle_img_path, cv.IMREAD_UNCHANGED)

        # save the dimensions of the needle image
        self.needle_w = self.needle_img.shape[1]
        self.needle_h = self.needle_img.shape[0]

        # there are 6 methods to choose from:
        # TM_CCOEFF, TM_CCOEFF_NORMED, TM_CCORR, TM_CCORR_NORMED, TM_SQDIFF, TM_SQDIFF_NORMED
        self.method = method
We'll want to make findClickPositions() a method inside of the Vision class. To do that, get your tabs right, and remember to add self as the first parameter. We also no longer need the needle_img_path parameter in this function, nor the other steps that are now handled by the construtor. Remember to update all usages of those variables that are now class properties to use self.. I'm also going to take this opportunity to change this function name to simply find().
After those changes, we end up with a method that looks like this:
def find(self, haystack_img, threshold=0.5, debug_mode=None):
    # run the OpenCV algorithm
    result = cv.matchTemplate(haystack_img, self.needle_img, self.method)

    # Get the all the positions from the match result that exceed our threshold
    locations = np.where(result >= threshold)
    locations = list(zip(*locations[::-1]))
    #print(locations)

    # You'll notice a lot of overlapping rectangles get drawn. We can eliminate those redundant
    # locations by using groupRectangles().
    # First we need to create the list of [x, y, w, h] rectangles
    rectangles = []
    for loc in locations:
        rect = [int(loc[0]), int(loc[1]), self.needle_w, self.needle_h]
        # Add every box to the list twice in order to retain single (non-overlapping) boxes
        rectangles.append(rect)
        rectangles.append(rect)
    # Apply group rectangles.
    # The groupThreshold parameter should usually be 1. If you put it at 0 then no grouping is
    # done. If you put it at 2 then an object needs at least 3 overlapping rectangles to appear
    # in the result. I've set eps to 0.5, which is:
    # "Relative difference between sides of the rectangles to merge them into a group."
    rectangles, weights = cv.groupRectangles(rectangles, groupThreshold=1, eps=0.5)
    #print(rectangles)

    points = []
    if len(rectangles):
        #print('Found needle.')

        line_color = (0, 255, 0)
        line_type = cv.LINE_4
        marker_color = (255, 0, 255)
        marker_type = cv.MARKER_CROSS

        # Loop over all the rectangles
        for (x, y, w, h) in rectangles:

            # Determine the center position
            center_x = x + int(w/2)
            center_y = y + int(h/2)
            # Save the points
            points.append((center_x, center_y))

            if debug_mode == 'rectangles':
                # Determine the box position
                top_left = (x, y)
                bottom_right = (x + w, y + h)
                # Draw the box
                cv.rectangle(haystack_img, top_left, bottom_right, color=line_color,
                            lineType=line_type, thickness=2)
            elif debug_mode == 'points':
                # Draw the center point
                cv.drawMarker(haystack_img, (center_x, center_y),
                            color=marker_color, markerType=marker_type,
                            markerSize=40, thickness=2)

    if debug_mode:
        cv.imshow('Matches', haystack_img)

    return points
Now we need to update our main.py to work with our new Vision class. Update the import, and then we can initialize our vision object before starting the main loop.
# initialize the Vision class
vision_limestone = Vision('albion_limestone.jpg')
Inside the main loop, we can now call find() on that vision object, passing in the latest screenshot from WindowCapture.
# display the processed image
points = vision_limestone.find(screenshot, threshold=0.60, debug_mode='rectangles')
Test these changes to confirm that everything is still working as before.
Depending on the game (or other application) you're trying to detect objects in, this may be as far as you need to take things. If you only need to detect one type of object, and the object you're looking for is relatively static (it's shape and color don't change much), then you'll likely find that no additional processing is needed.

But if you're trying to get vision on a more dynamic game, like Albion Online, you'll quickly notice several problems with our object detection. Let's say we're trying to detect a resource we want to gather, like an ore or stone to quarry.
First you'll find that not every deposit looks the same. You could combat this by lowering your detection threshold, but then you're more likely to pick up false positives. You might also try searching for multiple needle images, but this quickly slows our detection to a crawl. I'm already down to around 7 FPS just finding a single needle.
Another problem is that the shape of these resources changes slightly as our character moves around them.
But the most difficult problem of all to overcome is the day/night cycle in Albion Online. There's no way to disable this in the settings, so we'll need to figure out some other way to deal with it.
In the next several parts of this tutorial series, we'll discuss some strategies for improving our script's performance: both in how accurately it detects objects, and in how quickly it processes images.

HSV Color Range Thresholding

Canny Edge Detection? ORB Feature Matching?
Training a Cascade Classifier
 My name is Ben and I help people learn how to code by gaming.
I believe in the power of project-based learning to foster a deep understanding and joy in the craft of
software development.
On this site I share programming tutorials, coding-game reviews, and project ideas for you to explore.
My name is Ben and I help people learn how to code by gaming.
I believe in the power of project-based learning to foster a deep understanding and joy in the craft of
software development.
On this site I share programming tutorials, coding-game reviews, and project ideas for you to explore.