by playing video games.
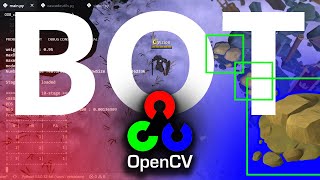
OpenCV Object Detection in Games
HSV Color Range Thresholding
Improve your object detection by using the HSV Thresholding technique in OpenCV. I'll also show you how to use the OpenCV GUI builder to adjust your image processing in real-time. This is a Python tutorial.
Links
Grab the code on GitHub: https://github.com/learncodebygaming/opencv_tutorials
Official threshold filter tutorial: https://docs.opencv.org/4.2.0/da/d97/tutorial_threshold_inRange.html
In the previous steps, we learned how to apply OpenCV's matchTemplate() to a video game in real-time. This code achieves object detection, but in many situations it's not working as well as we'd like. We can get better results by first processing our images before sending them through to matchTemplate().
In this article, we'll discuss one such method for pre-processing: Hue-Saturation-Value filtering (HSV range thresholding).
In preparation to potentially apply multiple types of filters in the future, let's begin by refactoring our find() method in the Vision class. We'll break this up into different methods for greater flexibility. Let's make find() simply return the rectangle results from match templates. I've added additional code here to limit the maximum number of results returned, as well as to return an empty list that can easily be joined with result lists from other find() calls.
Next we'll write get_click_points(self, rectangles), which will return a list of [x, y] coordinates at the midpoint of each rectangle. This is the same code we had in find() before, but now it's untangled from the debug output.
Finally, let's write separate methods for draw_rectangles() and draw_crosshairs(). These will replace our debug output from before. And instead of having these methods be responsible for calling cv.imshow(), let's instead simply return the output images and move the cv.imshow() responsibility to our main file.
# vision.py
import cv2 as cv
import numpy as np


class Vision:

    # properties
    needle_img = None
    needle_w = 0
    needle_h = 0
    method = None

    # constructor
    def __init__(self, needle_img_path, method=cv.TM_CCOEFF_NORMED):
        # load the image we're trying to match
        # https://docs.opencv.org/4.2.0/d4/da8/group__imgcodecs.html
        self.needle_img = cv.imread(needle_img_path, cv.IMREAD_UNCHANGED)

        # Save the dimensions of the needle image
        self.needle_w = self.needle_img.shape[1]
        self.needle_h = self.needle_img.shape[0]

        # There are 6 methods to choose from:
        # TM_CCOEFF, TM_CCOEFF_NORMED, TM_CCORR, TM_CCORR_NORMED, TM_SQDIFF, TM_SQDIFF_NORMED
        self.method = method

    # refactored to move the debug output and midpoint calculations into separate methods
    def find(self, haystack_img, threshold=0.5, max_results=10):
        # run the OpenCV algorithm
        result = cv.matchTemplate(haystack_img, self.needle_img, self.method)

        # Get the all the positions from the match result that exceed our threshold
        locations = np.where(result >= threshold)
        locations = list(zip(*locations[::-1]))

        # if we found no results, return now. this reshape of the empty array allows us to
        # concatenate together results without causing an error
        if not locations:
            return np.array([], dtype=np.int32).reshape(0, 4)

        # You'll notice a lot of overlapping rectangles get drawn. We can eliminate those redundant
        # locations by using groupRectangles().
        # First we need to create the list of [x, y, w, h] rectangles
        rectangles = []
        for loc in locations:
            rect = [int(loc[0]), int(loc[1]), self.needle_w, self.needle_h]
            # Add every box to the list twice in order to retain single (non-overlapping) boxes
            rectangles.append(rect)
            rectangles.append(rect)
        # Apply group rectangles.
        # The groupThreshold parameter should usually be 1. If you put it at 0 then no grouping is
        # done. If you put it at 2 then an object needs at least 3 overlapping rectangles to appear
        # in the result. I've set eps to 0.5, which is:
        # "Relative difference between sides of the rectangles to merge them into a group."
        rectangles, weights = cv.groupRectangles(rectangles, groupThreshold=1, eps=0.5)
        #print(rectangles)

        # for performance reasons, return a limited number of results.
        # these aren't necessarily the best results.
        if len(rectangles) > max_results:
            print('Warning: too many results, raise the threshold.')
            rectangles = rectangles[:max_results]

        # return the final list of [x, y, w, h] rectangles
        return rectangles

    # given a list of [x, y, w, h] rectangles returned by find(), convert those into a list of
    # [x, y] positions in the center of those rectangles where we can click on those found items
    def get_click_points(self, rectangles):
        points = []

        # Loop over all the rectangles
        for (x, y, w, h) in rectangles:
            # determine the center position
            center_x = x + int(w / 2)
            center_y = y + int(h / 2)

            # save the position
            points.append((center_x, center_y))

        return points

    # given a list of [x, y, w, h] rectangles and a canvas image to draw on, return an image with
    # all of those rectangles drawn
    def draw_rectangles(self, haystack_img, rectangles):
        # these colors are actually BGR
        line_color = (0, 255, 0)
        line_type = cv.LINE_4

        for (x, y, w, h) in rectangles:
            # determine the box positions
            top_left = (x, y)
            bottom_right = (x + w, y + h)
            # draw the box
            cv.rectangle(haystack_img, top_left, bottom_right, line_color, lineType=line_type)

        return haystack_img

    # given a list of [x, y] positions and a canvas image to draw on, return an image with all
    # of those click points drawn on as crosshairs
    def draw_crosshairs(self, haystack_img, points):
        # these colors are actually BGR
        marker_color = (255, 0, 255)
        marker_type = cv.MARKER_CROSS

        for (center_x, center_y) in points:
            # draw the center point
            cv.drawMarker(haystack_img, (center_x, center_y), marker_color, marker_type)

        return haystack_img
In our main loop, we can now call find() to get the rectangle results from matchTemplate(), call draw_rectangles() to get the screenshot image with those rectangles drawn on it, and then give that processed image to cv.imshow().
# get an updated image of the game
screenshot = wincap.get_screenshot()
# do object detection
rectangles = vision_limestone.find(screenshot, 0.5)
# draw the detection results onto the original image
output_image = vision_limestone.draw_rectangles(screenshot, rectangles)
# display the processed image
cv.imshow('Matches', output_image)
Now's a good time to test and confirm everything is still working as before.
With our vision code set up like this, we now have the flexibility to mix and match what sort of processing we do on each image before ultimately displaying it. And we can do that processing either before or after calling find() to search for our needle image.
Our goal in the rest of this series is to use additional processing to make our object detection targets easier for matchTemplate() to recognize. We'll begin this exploration with HSV color filtering.
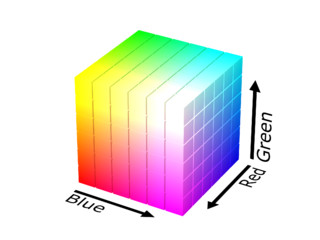
Up to this point, we've been working with images in BGR format (Blue-Green-Red). In this format, each of these three color channels is represented by a number from 0 to 255, where 0 is the complete lack of this color and 255 is the complete presence of this color. If the object we are looking to detect is blue, we might try ignoring the green and red channels and just focus on the blue, where our object really pops out. This could be done by changing the green and red value on every pixel in our image to 0, so that only the blue values remain. This would eliminate any non-blue objects from possibly causing a false detection.
We could go one step further if our object was always bright blue, and we wanted to ignore dark blue objects. In that case, we could look at the blue value of every pixel and if it's below a certain value (say 150) change that value to 0. This would effectively eliminate all dark blue objects.
The technique we've just described is called color filtering, or range thresholding (in this context they mean the same thing). By pre-processing an image in this way, it reduces the chance of false-positives, which in turn allows us to lower the match threshold we give matchTemplate. The net result is we can detect a wider variety of objects from a single template image, without also exploding our rate of incorrect detections.
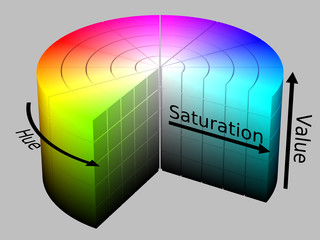
While it's possible to do color filtering in BGR format, you'll find it's very difficult to work with for any color that isn't exactly blue, green, or red. The other colors and shades arise from a combination of these three channels. For this reason, it's very helpful to first convert our image into HSV (hue-saturation-value) format. The hue allows us to isolate the color range with a single value. The saturation and value channels are also more intuitive to work with. In OpenCV HSV format, hue is represented by an integer from 0 to 179, while saturation and value are 0 to 255.
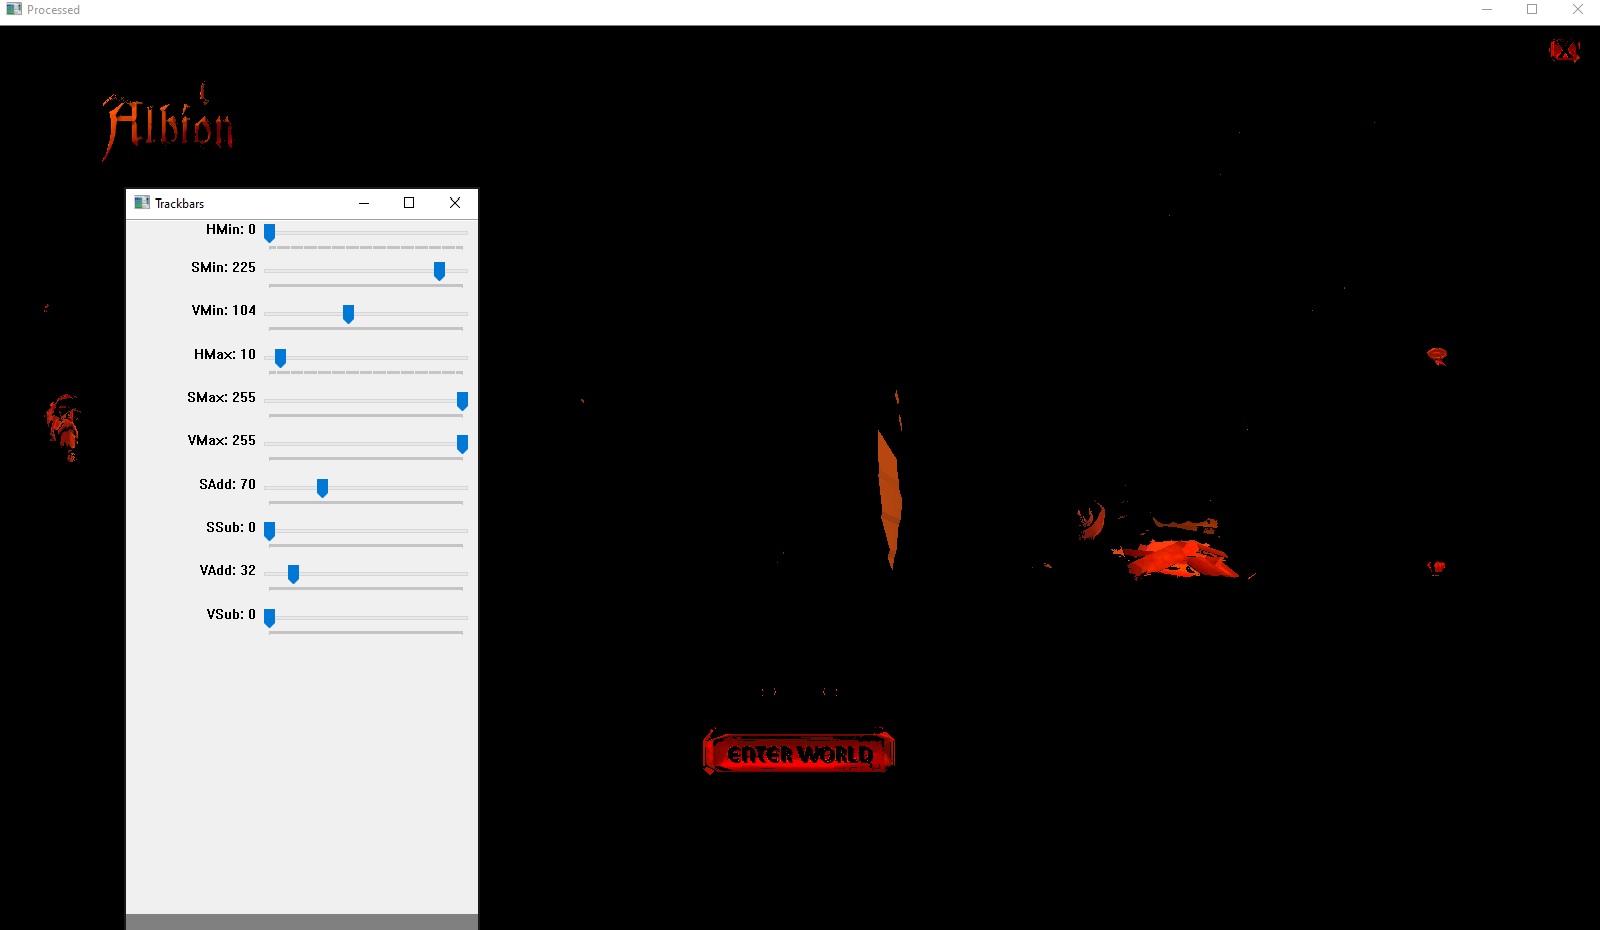
To fine tune our filtering, it would be great if we could adjust these values and see the results in real-time. OpenCV has a nifty GUI builder that's perfect for this. We'll create a new window with trackbars for each filter so that we can adjust them in real-time. Let's set this window name as a Vision class variable TRACKBAR_WINDOW = "Trackbars" and then write a method to create this control window:
# create gui window with controls for adjusting arguments in real-time
def init_control_gui(self):
    cv.namedWindow(self.TRACKBAR_WINDOW, cv.WINDOW_NORMAL)
    cv.resizeWindow(self.TRACKBAR_WINDOW, 350, 700)

    # required callback. we'll be using getTrackbarPos() to do lookups
    # instead of using the callback.
    def nothing(position):
        pass

    # create trackbars for bracketing.
    # OpenCV scale for HSV is H: 0-179, S: 0-255, V: 0-255
    cv.createTrackbar('HMin', self.TRACKBAR_WINDOW, 0, 179, nothing)
    cv.createTrackbar('SMin', self.TRACKBAR_WINDOW, 0, 255, nothing)
    cv.createTrackbar('VMin', self.TRACKBAR_WINDOW, 0, 255, nothing)
    cv.createTrackbar('HMax', self.TRACKBAR_WINDOW, 0, 179, nothing)
    cv.createTrackbar('SMax', self.TRACKBAR_WINDOW, 0, 255, nothing)
    cv.createTrackbar('VMax', self.TRACKBAR_WINDOW, 0, 255, nothing)
    # Set default value for Max HSV trackbars
    cv.setTrackbarPos('HMax', self.TRACKBAR_WINDOW, 179)
    cv.setTrackbarPos('SMax', self.TRACKBAR_WINDOW, 255)
    cv.setTrackbarPos('VMax', self.TRACKBAR_WINDOW, 255)

    # trackbars for increasing/decreasing saturation and value
    cv.createTrackbar('SAdd', self.TRACKBAR_WINDOW, 0, 255, nothing)
    cv.createTrackbar('SSub', self.TRACKBAR_WINDOW, 0, 255, nothing)
    cv.createTrackbar('VAdd', self.TRACKBAR_WINDOW, 0, 255, nothing)
    cv.createTrackbar('VSub', self.TRACKBAR_WINDOW, 0, 255, nothing)
In the code above, I've created trackbars to threhold the min and max of each of the hue, saturation, and value channels. I've also added trackbars that will allow us to increase or descrease the saturation and value. We could call this function in the Vision class constructor, but I'd like to call it in main instead so that we can easily disable it when we no longer need it.
# initialize the WindowCapture class
wincap = WindowCapture('Albion Online Client')
# initialize the Vision class
vision_limestone = Vision('albion_limestone.jpg')
# initialize the trackbar window
vision_limestone.init_control_gui()
If you run this code, you should see the GUI window appear with the trackbars we've created, but moving them doesn't do anything yet. We need a way to capture these values and apply the corresponding action.
Because there are a lot of values we're tracking here, I'm going to create a custom data structure to hold the state of these filters. In Python, creating a custom data structure is as simple as creating a new class.
# hsvfilter.py
class HsvFilter():

    def __init__(self, hMin=None, sMin=None, vMin=None, hMax=None, sMax=None, vMax=None,
                    sAdd=None, sSub=None, vAdd=None, vSub=None):
        self.hMin = hMin
        self.sMin = sMin
        self.vMin = vMin
        self.hMax = hMax
        self.sMax = sMax
        self.vMax = vMax
        self.sAdd = sAdd
        self.sSub = sSub
        self.vAdd = vAdd
        self.vSub = vSub
Remember to import HsvFilter in your vision.py file: from hsvfilter import HsvFilter. Now we can write a method that will read the values from our control GUI trackbars and save them to an HsvFilter object.
# returns an HSV filter object based on the control GUI values
def get_hsv_filter_from_controls(self):
     # Get current positions of all trackbars
    hsv_filter = HsvFilter()
    hsv_filter.hMin = cv.getTrackbarPos('HMin', self.TRACKBAR_WINDOW)
    hsv_filter.sMin = cv.getTrackbarPos('SMin', self.TRACKBAR_WINDOW)
    hsv_filter.vMin = cv.getTrackbarPos('VMin', self.TRACKBAR_WINDOW)
    hsv_filter.hMax = cv.getTrackbarPos('HMax', self.TRACKBAR_WINDOW)
    hsv_filter.sMax = cv.getTrackbarPos('SMax', self.TRACKBAR_WINDOW)
    hsv_filter.vMax = cv.getTrackbarPos('VMax', self.TRACKBAR_WINDOW)
    hsv_filter.sAdd = cv.getTrackbarPos('SAdd', self.TRACKBAR_WINDOW)
    hsv_filter.sSub = cv.getTrackbarPos('SSub', self.TRACKBAR_WINDOW)
    hsv_filter.vAdd = cv.getTrackbarPos('VAdd', self.TRACKBAR_WINDOW)
    hsv_filter.vSub = cv.getTrackbarPos('VSub', self.TRACKBAR_WINDOW)
    return hsv_filter
With our trackbar values neatly packaged up in a single object, we can now move on to the main task of writing a function that will apply these filters. Let me show you the code first, and then I'll break it down. It would be good practice for you to read this code first and see how much of it you understand before reading my explanation of it.
# given an image and an HSV filter, apply the filter and return the resulting image.
# if a filter is not supplied, the control GUI trackbars will be used
def apply_hsv_filter(self, original_image, hsv_filter=None):
    # convert image to HSV
    hsv = cv.cvtColor(original_image, cv.COLOR_BGR2HSV)

    # if we haven't been given a defined filter, use the filter values from the GUI
    if not hsv_filter:
        hsv_filter = self.get_hsv_filter_from_controls()

    # add/subtract saturation and value
    h, s, v = cv.split(hsv)
    s = self.shift_channel(s, hsv_filter.sAdd)
    s = self.shift_channel(s, -hsv_filter.sSub)
    v = self.shift_channel(v, hsv_filter.vAdd)
    v = self.shift_channel(v, -hsv_filter.vSub)
    hsv = cv.merge([h, s, v])

    # Set minimum and maximum HSV values to display
    lower = np.array([hsv_filter.hMin, hsv_filter.sMin, hsv_filter.vMin])
    upper = np.array([hsv_filter.hMax, hsv_filter.sMax, hsv_filter.vMax])
    # Apply the thresholds
    mask = cv.inRange(hsv, lower, upper)
    result = cv.bitwise_and(hsv, hsv, mask=mask)

    # convert back to BGR for imshow() to display it properly
    img = cv.cvtColor(result, cv.COLOR_HSV2BGR)

    return img

# apply adjustments to an HSV channel
# https://stackoverflow.com/questions/49697363/shifting-hsv-pixel-values-in-python-using-numpy
def shift_channel(self, c, amount):
    if amount > 0:
        lim = 255 - amount
        c[c >= lim] = 255
        c[c < lim] += amount
    elif amount < 0:
        amount = -amount
        lim = amount
        c[c <= lim] = 0
        c[c > lim] -= amount
    return c
Converting an image to HSV and back again to BGR is pretty straight forward, using the cv.cvtColor() function that we've seen before. Next we add/subtract to the saturation and value. To do this we split the HSV image into its component channels, increase or decrease these channel numbers based on the HsvFilter object values, and then merge these channels back into a single HSV image. Finally we apply the min and max filters for each channel using cv.inRange() to first create a mask, and then cv.bitwise_and() to apply that mask as a threshold to the HSV image. The result is that any pixel that does not meet one of the thresholds set in our HSV filter will be turned black.
All that's left to do is call apply_hsv_filter() in main. We'll disable the object detection calls for now as we focus on the HSV color filtering.
# get an updated image of the game
screenshot = wincap.get_screenshot()
# pre-process the image
output_image = vision_limestone.apply_hsv_filter(screenshot)
# do object detection
#rectangles = vision_limestone.find(screenshot, 0.5)
# draw the detection results onto the original image
#output_image = vision_limestone.draw_rectangles(screenshot, rectangles)
# display the processed image
cv.imshow('Matches', output_image)
Now let's run our code. Play around with each of the trackbar sliders in the control GUI to see how each one affects the output. Once you've tried them all, try focusing on one object in your image and adjust the sliders until nearly everything is blacked out except your target. When you've done that, reset the sliders and pick another object. With some practice you should be able to get results that make your target stand out pretty well.
Once you've found those ideal filter settings, write them down or take a screenshot. We'll use them to create a fixed HsvFilter object with these settings.
# permanent HSV filter
hsv_filter = HsvFilter(0, 103, 207, 21, 151, 255, 54, 0, 133, 0)
# pre-process the image
output_image = vision_limestone.apply_hsv_filter(screenshot, hsv_filter)
To tie this all together, the last step is to crop out a needle image from this processed image and use that to do our object detection. You'll also need to pass in the processed image to find() as the image to be searched, not the original screenshot. You should now be able to use lower threshold values when calling find(), and your object detection overall should be much more effective. I find it helpful to output windows for both the processed image and the object detection.
# main.py
import cv2 as cv
import numpy as np
import os
from time import time
from windowcapture import WindowCapture
from vision import Vision
from hsvfilter import HsvFilter


# initialize the WindowCapture class
wincap = WindowCapture('Albion Online Client')
# initialize the Vision class
vision_limestone = Vision('albion_limestone_processed.jpg')
# initialize the trackbar window
vision_limestone.init_control_gui()

loop_time = time()
while(True):

    # get an updated image of the game
    screenshot = wincap.get_screenshot()

    # permanent HSV filter
    hsv_filter = HsvFilter(0, 103, 207, 21, 151, 255, 54, 0, 133, 0)
    # pre-process the image
    processed_image = vision_limestone.apply_hsv_filter(screenshot, hsv_filter)

    # do object detection
    rectangles = vision_limestone.find(processed_image, 0.46)

    # draw the detection results onto the original image
    detection_image = vision_limestone.draw_rectangles(screenshot, rectangles)

    # display the processed image
    cv.imshow('Processed', processed_image)
    cv.imshow('Matches', detection_image)

    # debug the loop rate
    print('FPS {}'.format(1 / (time() - loop_time)))
    loop_time = time()

    # press 'q' with the output window focused to exit.
    # waits 1 ms every loop to process key presses
    if cv.waitKey(1) == ord('q'):
        cv.destroyAllWindows()
        break

print('Done.')
That about covers the color range thresholding technique. Like with all these image processing techniques, you'll find that this one works awesome in some situations, but not so well in others. With Albion Online in particular, we've made some improvements using this, but we still haven't solved the day/night cycle problem. This cycle causes the hues to shift, which throws our filter out of alignment. One solution might be to detect which part of the cycle we're in, and adjust our filters accordingly, but we're going to take a different approach in the next tutorial and try another image processing technique.

Canny Edge Detection? ORB Feature Matching?
Training a Cascade Classifier
How To Build a Bot with OpenCV
 My name is Ben and I help people learn how to code by gaming.
I believe in the power of project-based learning to foster a deep understanding and joy in the craft of
software development.
On this site I share programming tutorials, coding-game reviews, and project ideas for you to explore.
My name is Ben and I help people learn how to code by gaming.
I believe in the power of project-based learning to foster a deep understanding and joy in the craft of
software development.
On this site I share programming tutorials, coding-game reviews, and project ideas for you to explore.