by playing video games.
OpenCV Object Detection in Games
Canny Edge Detection? ORB Feature Matching?
Learn from my explorations with using Canny Edge Detection and ORB Feature Matching to detect objects in video games in real-time.
Links
Grab the code on GitHub: https://github.com/learncodebygaming/opencv_tutorials
Official Canny Edge tutorial: https://docs.opencv.org/4.2.0/da/d22/tutorial_py_canny.html
Erode and Dilate tutorial: https://opencv-python-tutroals.readthedocs.io/en/latest/py_tutorials/py_imgproc/py_morphological_ops/py_morphological_ops.html
Good discussion of scaling canny results, plus keypoint matching with ORB: https://stackoverflow.com/a/50660014/4655368
Official Feature Detection ORB tutorials: https://docs.opencv.org/4.2.0/db/d27/tutorial_py_table_of_contents_feature2d.html
My original plan was to simply apply Canny edge detection to our processed images, and then send those through matchTemplate() like we have been doing. Because the edges around our target objects do not change much with lighting or color changes, the idea was we could use this to get around the problems with detecting limestone deposits in Albion Online due to the presence of a day/night cycle. But as you'll see, this didn't work out very well.
The code to apply a Canny edge filter is very similar to the last tutorial in this series. We'll add some new trackbars to our GUI, create a data structure to hold the values of these trackbars, and write a method to get an object with the current values from the GUI.
def init_control_gui(self):
    # [...] existing code for the HSV trackbars

    # trackbars for edge creation
    cv.createTrackbar('KernelSize', self.TRACKBAR_WINDOW, 1, 30, nothing)
    cv.createTrackbar('ErodeIter', self.TRACKBAR_WINDOW, 1, 5, nothing)
    cv.createTrackbar('DilateIter', self.TRACKBAR_WINDOW, 1, 5, nothing)
    cv.createTrackbar('Canny1', self.TRACKBAR_WINDOW, 0, 200, nothing)
    cv.createTrackbar('Canny2', self.TRACKBAR_WINDOW, 0, 500, nothing)
    # Set default value for Canny trackbars
    cv.setTrackbarPos('KernelSize', self.TRACKBAR_WINDOW, 5)
    cv.setTrackbarPos('Canny1', self.TRACKBAR_WINDOW, 100)
    cv.setTrackbarPos('Canny2', self.TRACKBAR_WINDOW, 200)
# edgefilter.py
# custom data structure to hold the state of a Canny edge filter
class EdgeFilter:

    def __init__(self, kernelSize=None, erodeIter=None, dilateIter=None, canny1=None,
                    canny2=None):
        self.kernelSize = kernelSize
        self.erodeIter = erodeIter
        self.dilateIter = dilateIter
        self.canny1 = canny1
        self.canny2 = canny2
# returns a Canny edge filter object based on the control GUI values
def get_edge_filter_from_controls(self):
    # Get current positions of all trackbars
    edge_filter = EdgeFilter()
    edge_filter.kernelSize = cv.getTrackbarPos('KernelSize', self.TRACKBAR_WINDOW)
    edge_filter.erodeIter = cv.getTrackbarPos('ErodeIter', self.TRACKBAR_WINDOW)
    edge_filter.dilateIter = cv.getTrackbarPos('DilateIter', self.TRACKBAR_WINDOW)
    edge_filter.canny1 = cv.getTrackbarPos('Canny1', self.TRACKBAR_WINDOW)
    edge_filter.canny2 = cv.getTrackbarPos('Canny2', self.TRACKBAR_WINDOW)
    return edge_filter
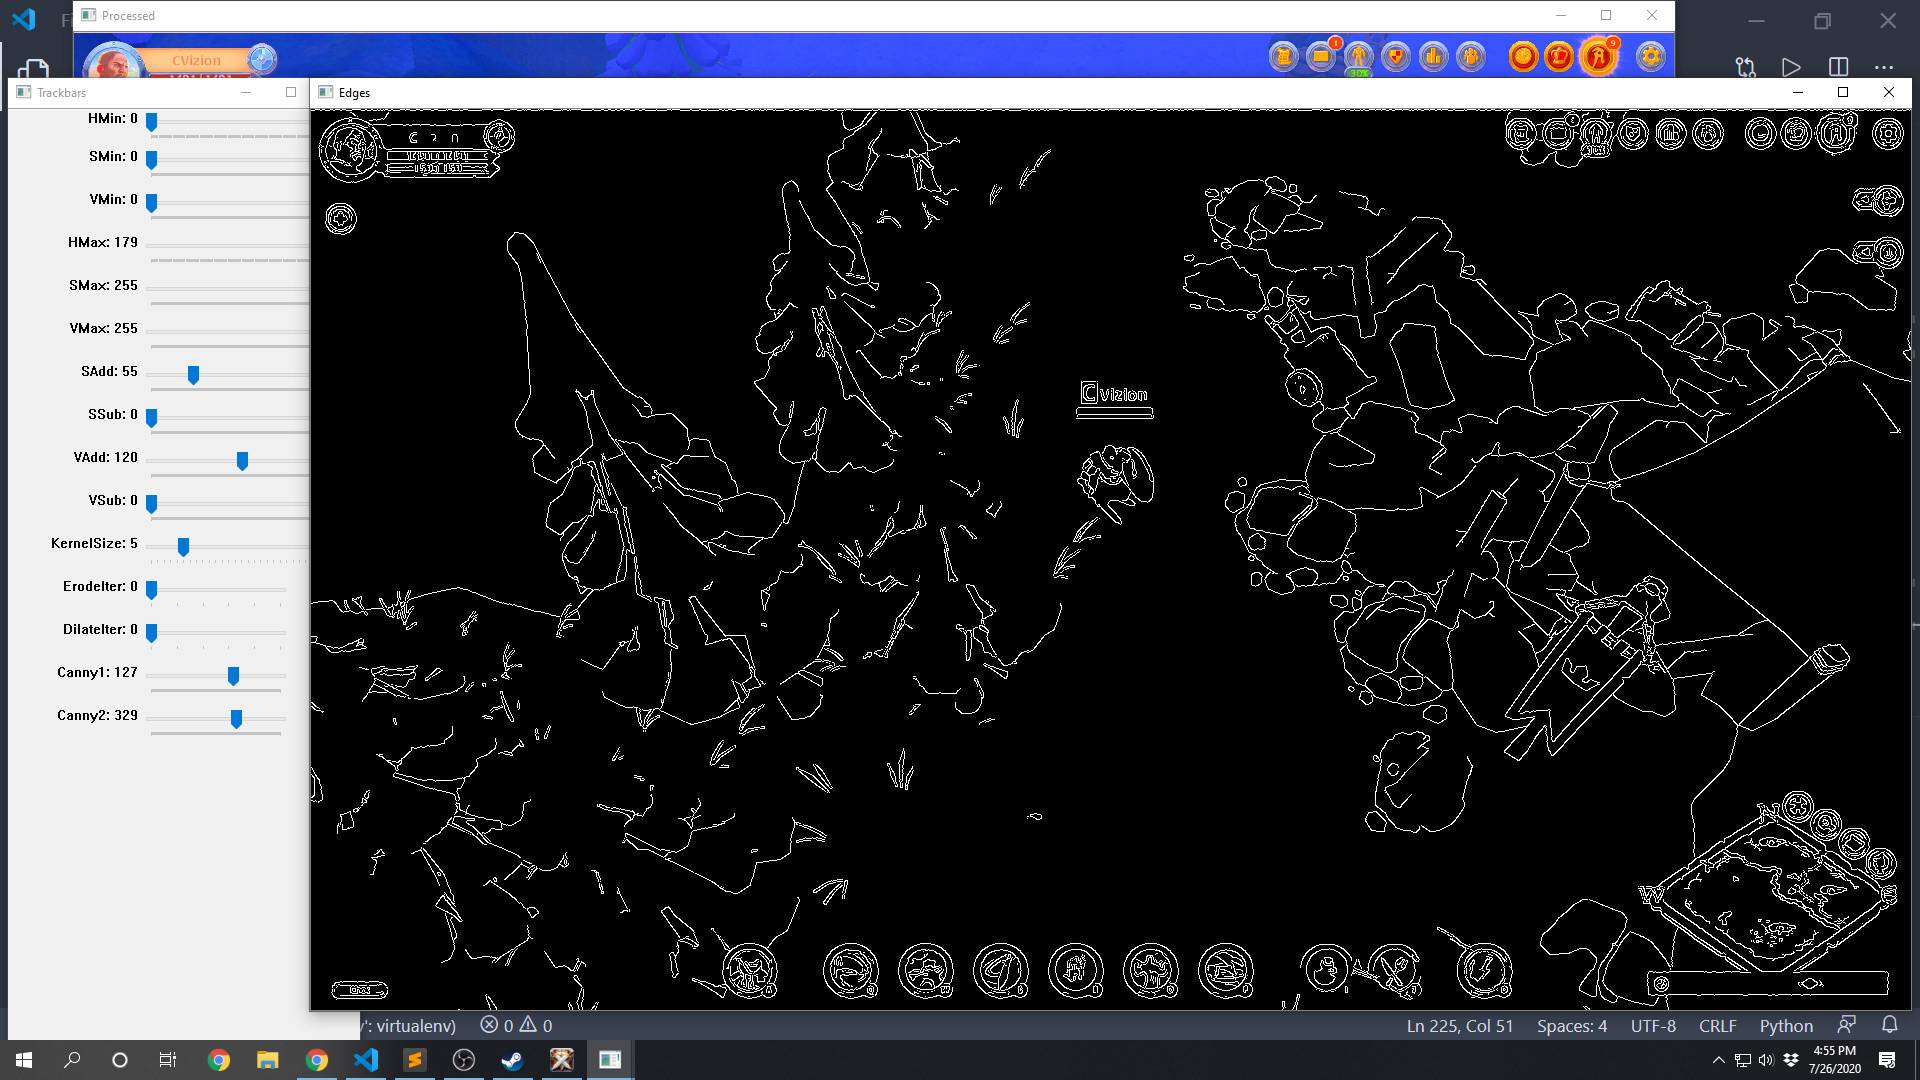
The Canny edge filter takes two threshold parameters that determine the fineness of the edge detection. In addition, I'll include an erode and dilate filter that will give us even greater control over the edge detection results. The method I came up with to apply these filters, similar to apply_hsv_filter() from the previous tutorial, is this:
# given an image and a Canny edge filter, apply the filter and return the resulting image.
# if a filter is not supplied, the control GUI trackbars will be used
def apply_edge_filter(self, original_image, edge_filter=None):
    # if we haven't been given a defined filter, use the filter values from the GUI
    if not edge_filter:
        edge_filter = self.get_edge_filter_from_controls()

    kernel = np.ones((edge_filter.kernelSize, edge_filter.kernelSize), np.uint8)
    eroded_image = cv.erode(original_image, kernel, iterations=edge_filter.erodeIter)
    dilated_image = cv.dilate(eroded_image, kernel, iterations=edge_filter.dilateIter)

    # canny edge detection
    result = cv.Canny(dilated_image, edge_filter.canny1, edge_filter.canny2)

    # convert single channel image back to BGR
    img = cv.cvtColor(result, cv.COLOR_GRAY2BGR)

    return img
The result of cv.Canny() is a black and white image, where the white pixels are places where an edge was detected, and the black pixels are where there was none. I convert that image back into BGR format so that the result will continue to work with our other image processing filters applied after it.
In main.py, remember to import the new EdgeFilter class, make a call to apply_edge_filter() in the main loop, and output the results to a new OpenCV window using imshow(). Try playing around with the new trackbars to see what kind of results you can get.
Now the next step would be to crop out an image of your target object from the edges processed image, and like before use that as a needle and the Canny edge image as the haystack when you call find() on the vision object. If you try that, you'll find that it does a terrible job at matching your target as soon as you move your character even slightly. This is the case even if you turn your match threshold way down.
The reason we have such poor results is because of how matchTemplate() works. Remember this comparison method simply overlays the needle image on top of the haystack image, at every possible location, and gives a score for how well the pixels in the two layers match. When dealing with black and white images with thin lines like this, those pixels will never match up unless you're in the exact initial position that you took the screen capture from. Any other place where a white pixel is overlaid on a black pixel, in this algorithm, will be considered a terrible match.

I should have seen this problem coming, but I hadn't thought it through.
To salvage this attempt at using Canny edge images for object detection, I decided to try introducing ORB feature detection. OpenCV's feature detection algorithms have the same goal as matchTemplate(), but rather than naively comparing pixel values, they attempt to identify features that are common in both the needle and haystack images. So it's a more sophisticated matching technique.
I chose to use ORB because it's non-proprietary, and still supported in the latest versions of OpenCV. I didn't fully refine this method, because I wasn't encouraged enough by the results, but here's what I came up with:
def match_keypoints(self, original_image, patch_size=32):
    min_match_count = 5

    orb = cv.ORB_create(edgeThreshold=0, patchSize=patch_size)
    keypoints_needle, descriptors_needle = orb.detectAndCompute(self.needle_img, None)
    orb2 = cv.ORB_create(edgeThreshold=0, patchSize=patch_size, nfeatures=2000)
    keypoints_haystack, descriptors_haystack = orb2.detectAndCompute(original_image, None)

    FLANN_INDEX_LSH = 6
    index_params = dict(algorithm=FLANN_INDEX_LSH,
            table_number=6,
            key_size=12,
            multi_probe_level=1)

    search_params = dict(checks=50)

    try:
        flann = cv.FlannBasedMatcher(index_params, search_params)
        matches = flann.knnMatch(descriptors_needle, descriptors_haystack, k=2)
    except cv.error:
        return None, None, [], [], None

    # store all the good matches as per Lowe's ratio test.
    good = []
    points = []

    for pair in matches:
        if len(pair) == 2:
            if pair[0].distance < 0.7*pair[1].distance:
                good.append(pair[0])

    if len(good) > min_match_count:
        print('match %03d, kp %03d' % (len(good), len(keypoints_needle)))
        for match in good:
            points.append(keypoints_haystack[match.trainIdx].pt)
        #print(points)

    return keypoints_needle, keypoints_haystack, good, points
Remember that this is meant to be a replacement for find(), so it will use the needle image we initialized in the object constructor, and we'll pass into it the current screenshot (or processed image).
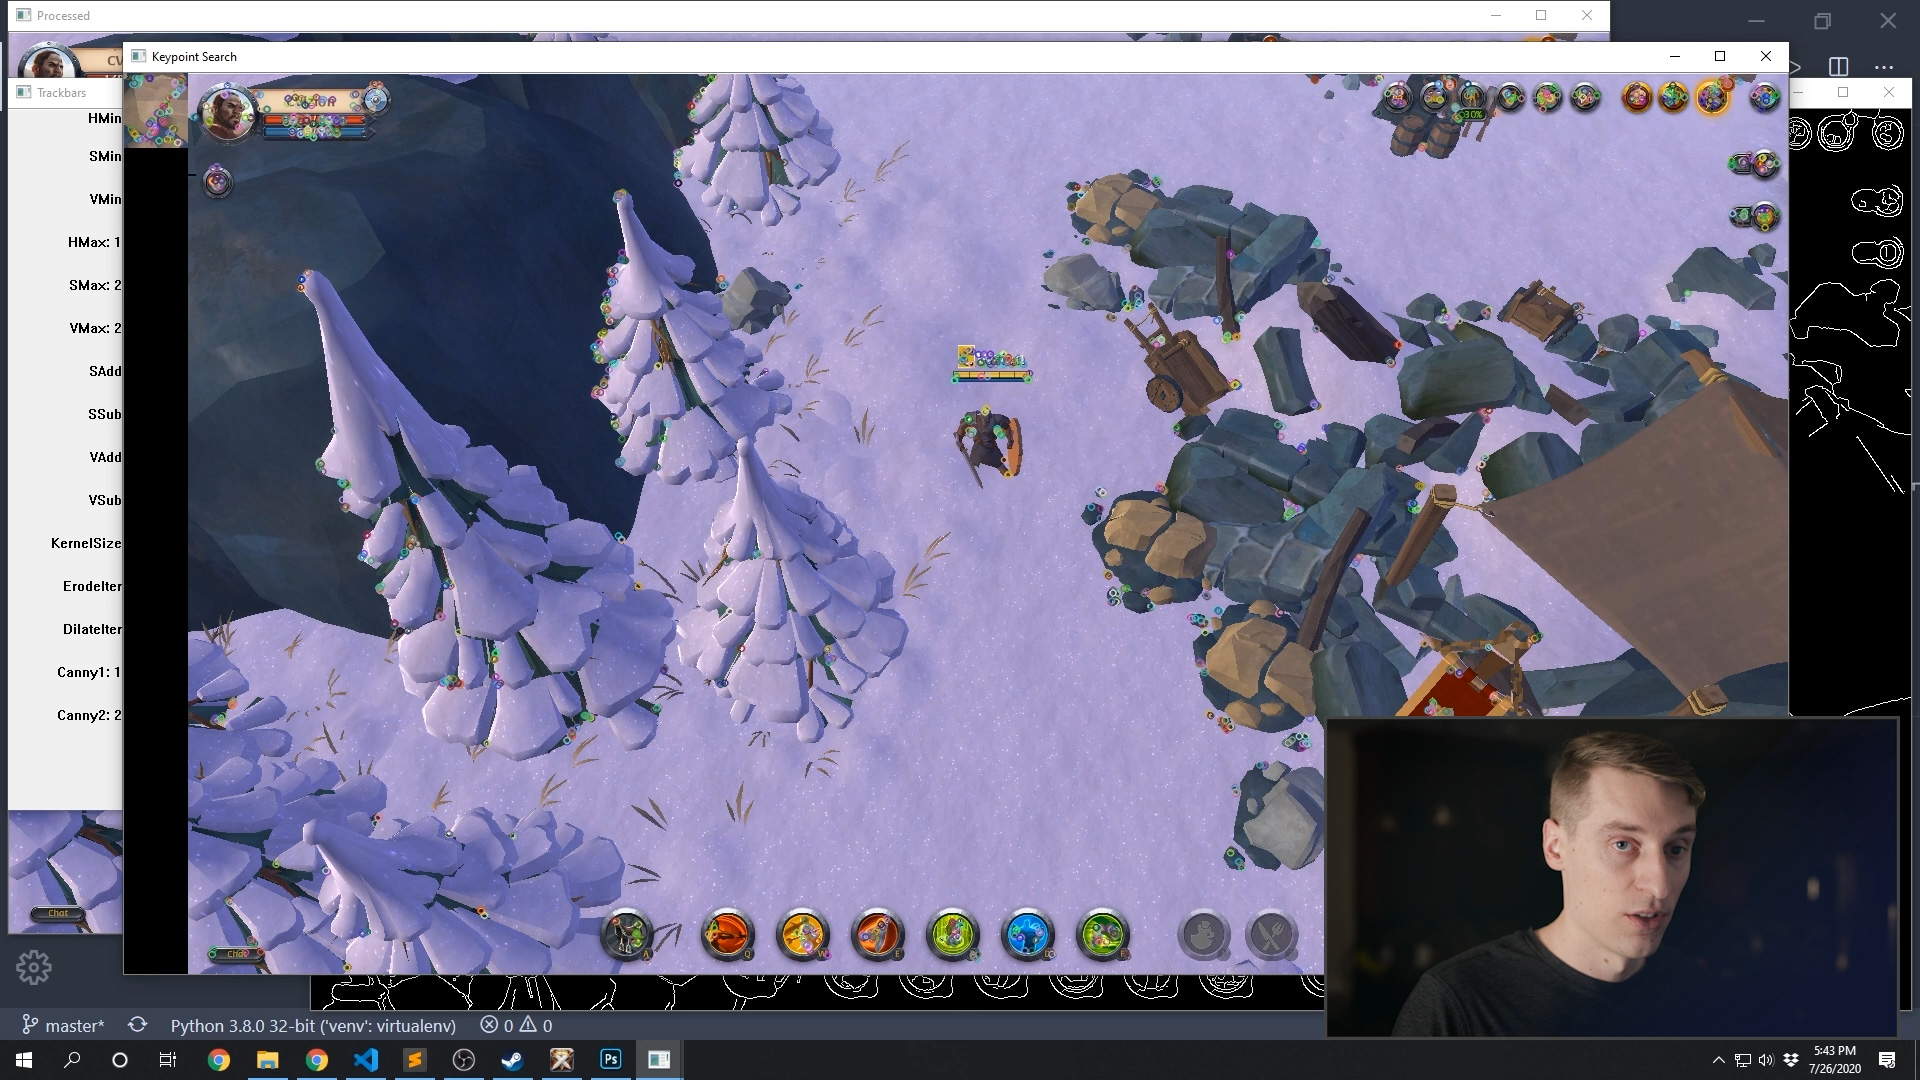
When we call match_keypoints() in main.py, we can use cv.drawMatches() to visualize the results.
kp1, kp2, matches, match_points = vision_limestone.match_keypoints(keypoint_image)
match_image = cv.drawMatches(
    vision_limestone.needle_img,
    kp1,
    keypoint_image,
    kp2,
    matches,
    None)
cv.imshow('Keypoint Search', match_image)
When you run this, you'll see all of the features detected in your needle image are circled, and all of the features detected in your haystack image are circled. Any time a keypoint matches in both images, a line will be drawn between them.
We can do the same thing using our Canny edge processed images as the needle and haystack.
When we have enough matches between the two images that we think we've detected the object we're searching for, the next step is to find the position of that object. The simplest way to do that is to find the average of all of the matched keypoints in the haystack image. So let's write a method in the Vision class to do that.
def centeroid(self, point_list):
    point_list = np.asarray(point_list, dtype=np.int32)
    length = point_list.shape[0]
    sum_x = np.sum(point_list[:, 0])
    sum_y = np.sum(point_list[:, 1])
    return [np.floor_divide(sum_x, length), np.floor_divide(sum_y, length)]
Then back in main.py, we can use that center point to draw a crosshair on our match_image.
if match_points:
    # find the center point of all the matched features
    center_point = vision_limestone.centeroid(match_points)
    # account for the width of the needle image that appears on the left
    center_point[0] += vision_limestone.needle_w
    # drawn the found center point on the output image
    match_image = vision_limestone.draw_crosshairs(match_image, [center_point])
As I experimented with this, I got mixed results. I noticed a lot of the keypoints identified in the haystack image were located on the user interface, which we aren't interested in matching. So I was able to get some nice improvements by cropping the haystack image to remove those elements. Overall I felt that the raw screenshot images performed better with ORB than the Canny edge images, but not dramatically so.
When keypoints are matched to multiple different limestone deposits, the centroid() method for finding the object click point obviously fails, because it chooses a point in the middle of those objects. We could find a better algorithm to solve this, but I didn't feel it was worth it because I still wasn't happy with the strength of the object detections using this method. The HSV filter method with matchTemplate() was still performing better.
So you might find better uses for Canny edge detection, and ORB feature matching definitely has more potential than what I've shown here. It would be a good project to explore those further. But for this series, this as far as we'll investigate those topics here.
Next, we'll dip our toes into OpenCV's machine learning features with Cascade Classifiers. Hopefully that yields better results!
Training a Cascade Classifier

How To Build a Bot with OpenCV
 My name is Ben and I help people learn how to code by gaming.
I believe in the power of project-based learning to foster a deep understanding and joy in the craft of
software development.
On this site I share programming tutorials, coding-game reviews, and project ideas for you to explore.
My name is Ben and I help people learn how to code by gaming.
I believe in the power of project-based learning to foster a deep understanding and joy in the craft of
software development.
On this site I share programming tutorials, coding-game reviews, and project ideas for you to explore.