by playing video games.
OpenCV Object Detection in Games
Training a Cascade Classifier
In this tutorial, we train an OpenCV Cascade Classifier entirely on Windows to detect objects in a video game in real-time. Making your own Haar Cascade isn't complicated, but it can be a lot of work. This project is a great intro for beginners to Machine Learning. I'll explain the basics of Machine Learning, and walk you through the implementation of training and using your own model for computer vision in Python.
Links
Grab the code on GitHub: https://github.com/learncodebygaming/opencv_tutorials
Official tutorial on training a Cascade Classifier: https://docs.opencv.org/4.2.0/dc/d88/tutorial_traincascade.html
Official tutorial on using a Cascade Classifier: https://docs.opencv.org/4.2.0/db/d28/tutorial_cascade_classifier.html
Installing OpenCV 3.4 on Windows: https://docs.opencv.org/3.4.11/d3/d52/tutorial_windows_install.html
Normally when we program something, like when we write a function (for example), we expect certain inputs (like the parameters in our function). And then at the end we'll end up with some output (like the return part of a function). And in the middle, to get from the input to the output, we write some logic (if statements, loops, all that stuff).
With Machine Learning it's exactly the same, except that middle part is replaced by a Machine Learning model. So with Machine Learning you're not writing any of your own logic anymore, instead you're trusting this mysterious dark jumble of multi-dimensional calculus to transform your inputs into your desired output.
And at first your model won't know how to do... what you want it to do. Its output will be no better than random guesses. To get the output we want, we must first train our model. We do that by showing it lots of input examples, and for each example we tell the model what we want the output to be. Once it has seen enough examples, a well trained model will be able to accurately predict what the output should be given some new set of inputs.
That's the super summarized version of how all Machine Learning works.
In our case, our input is going to be screenshot images from the video game we're playing. And the output we want is a list of rectangles that identify the objects we're trying to detect. And fortunately for us, OpenCV's Cascade Classifiers are designed to do exactly that.
OpenCV actually comes with two types of Cascade Classifiers: Haar and LBP. Haar is generally more accurate, while LBP is generally faster to train. And if you're not already aware, training these models can take a really long time: like hours or days is pretty common. I'm going to be focusing on Haar, but it's easy to switch if you want to give LBP a try.
The way a Haar classifier works is it looks for features in an image, very much like the ORB feature detection we talked about in the last video. And it looks for these features in different layers. So at the top layer it will be looking at large features that span nearly the whole image window, down to the bottom layer where it’s looking for very fine details. This makes the end model fast enough to detect objects in real-time, because it can quickly reject areas of the image that fail to match the features in the top-most layers. And it can spend more time analyzing areas of the image that are good candidates, by studying those finer details.
Alright, hopefully you have a general understanding now of how Machine Learning works, and what makes a Haar Cascade Classifier unique. The great part is, the code for all of this is very straight forward. You won't have any problem understanding it.
The art of doing this well actually isn't so much in the code, it's more in gathering the data to train your model with. To get good results, you need quality data, and you need lots of it. Like the more the better.
Now we need two types of data: We need the positive images - which are images that contain the object we're trying to detect... and we need negative images - which will be screenshots from the game that don't contain our object at all. The Machine Learning algorithm needs to see both what is and what is not the object in order for it to learn.
And you want to get examples of your object in as many different conditions as possible: so every possible lighting situation, different positions, all of that. In this series I've been looking for limestone deposits in Albion Online, and the day/night cycle has been giving me lots of problems. So I want to make sure to capture screenshots of limestone from all different times of the day. The quality of the dataset you gather is going to have a huge impact on how good your final detector is, so keep that in mind.
So the first step is getting our positive and negative images, and let's write some code to make that really easy on us.
# main.py
wincap = WindowCapture('Albion Online Client')

loop_time = time()
while(True):

    # get an updated image of the game
    screenshot = wincap.get_screenshot()

    # display the images
    cv.imshow('Unprocessed', screenshot)

    # debug the loop rate
    print('FPS {}'.format(1 / (time() - loop_time)))
    loop_time = time()

    # press 'q' with the output window focused to exit.
    # press 'f' to save screenshot as a positive image,
    # press 'd' to save as a negative image.
    # waits 1 ms every loop to process key presses
    key = cv.waitKey(1)
    if key == ord('q'):
        cv.destroyAllWindows()
        break
    elif key == ord('f'):
        cv.imwrite('positive/{}.jpg'.format(loop_time), screenshot)
    elif key == ord('d'):
        cv.imwrite('negative/{}.jpg'.format(loop_time), screenshot)

print('Done.')
Manually create folders for /positive and /negative in your project. Now with our game and our script both running, with the OpenCV output window focused we can press 'f' to capture a screenshot and save it to the positive folder, or 'd' to save a screenshot to the negative folder.
Remember you want to collect lots of examples of each. I captured 100 positive and 100 negative, but you will likely want to do even more than that. And remember to get a variety of samples from all different conditions you want your model to recognize objects in. When you're done, review your captures to check for any mistakes and confirm you got a good variety. Again, the more samples you get, the better your final results will be. But we can always come back, collect more screenshots later, and retrain our model.
Now we need to prepare the negative samples to be used for training. To do this, we simply need to create a text file that lists where all our negative samples can be found. Rather than do this manually, let's write a quick function to do this for us.
# reads all the files in the /negative folder and generates neg.txt from them.
def generate_negative_description_file():
    # open the output file for writing. will overwrite all existing data in there
    with open('neg.txt', 'w') as f:
        # loop over all the filenames
        for filename in os.listdir('negative'):
            f.write('negative/' + filename + '\n')
You can run this script manually from the Python console to generate the needed neg.txt file.
$ python
Python 3.8.0 (tags/v3.8.0:fa919fd, Oct 14 2019, 19:21:23) [MSC v.1916 32 bit (Intel)] on win32
Type "help", "copyright", "credits" or "license" for more information.
>>> from cascadeutils import generate_negative_description_file
>>> generate_negative_description_file()
>>> exit()
Next we need to generate a similar file for the positive images, but this one is a little more complicated. It needs to contain not only the image paths, but also the bounding box coordinates for each object we want to detect in each image. Rather than annotate these manually, or write a script ourselves, let's use OpenCV annotation program which is designed specifically for creating this file.
Unfortunately this simple opencv_annotation.exe command line program isn't included with pip installed OpenCV, and it isn't included in any installation of version 4.2.0. Instead we must install OpenCV version 3.4 to get access to this and other Cascade Classifier programs we will need.
I recommend downloading the newest version of OpenCV 3.4 from the pre-built Windows binaries. For me that was version 3.4.11. This file is a self-extacting ZIP, and you can save the contents anywhere that's convenient for you. Once extracting, you should find the executables we need in [your save location]/opencv/build/x64/vc15/bin/. The programs we'll be using should all be in that folder: opencv_annotation.exe, opencv_createsamples.exe, and opencv_traincascade.exe.
Even though we'll be preparing our samples and training our model with these programs from OpenCV 3.4, the resulting classifier will still be usable in our newer version of OpenCV.
Now we can run the annotation program.
$ C:/Users/Ben/learncodebygaming/opencv/build/x64/vc15/bin/opencv_annotation.exe --annotations=pos.txt --images=positive/
This program will open each image in your positive folder one at a time in an OpenCV window. In each image you should draw a box around the objects within it that you want to be able to detect. You click once to set the upper left corner, then again to set the lower right corner. You'll see a red box enclosing your object. Press 'c' to confirm this selection. If you don't like the box you've drawn, you can click again elsewhere to draw a different box. You can also press 'd' to undo the previous confirmation. When done with an image, click 'n' to move to the next one. You can press 'esc' to exit early, or it will exit automatically when you've annotated all of the images.
When you're done, review the pos.txt output file. You will likely need to change the direction of the slashes or else opencv_createsamples.exe will complain that it can't find your files in the next step.
Next we need to create a vector file from all of our positive annotations.
$ C:/Users/Ben/learncodebygaming/opencv/build/x64/vc15/bin/opencv_createsamples.exe -info pos.txt -w 24 -h 24 -num 1000 -vec pos.vec
There are a few arguments here to pay attention to. Value for -num should be greater than or equal to the number of rectangles you drew, so that all of them get turned into vectors. If you drew 100 rectangles and set this to 1000, it will still output only 100 vectors, so you can just make this any large number. The -w and -h is the detection window size you want to use. You won't be able to detect objects smaller than this size, and the larger you make this the longer it will take to train your model. 20 or 24 are common.
If you get an error like:
OpenCV: terminate handler is called! The last OpenCV error is: OpenCV(3.4.11) Error: Assertion failed (0 <= roi.x && 0 <= roi.width && roi.x + roi.width <= m.cols && 0 <= roi.y && 0 <= roi.height && roi.y + roi.height <= m.rows) in cv::Mat::Mat, file C:\build\3_4_winpack-build-win64-vc15\opencv\modules\core\src\matrix.cpp, line 466
This usually means opencv_createsamples.exe can't find the image files. Check the paths in the pos.txt file. Don't use spaces in the filepath, and fix the slashes. I had trouble using absolute paths here on Windows, so I recommend making the paths relative to your project folder, cd-ing into your project directory in your terminal, and running the .exe from there using the full absolute path on the .exe itself (like my commands demonstrate above).
When the create samples program completes successfully, it will tell you how many samples it created, which should be the same as how many rectangles you drew around objects in the annotation step.
Finally, we're ready to train our cascade classifier model!
Create a /cascade folder to hold the outputs from the training. Then you can run opencv_traincascade.exe.
$ C:/Users/Ben/learncodebygaming/opencv/build/x64/vc15/bin/opencv_traincascade.exe -data cascade/ -vec pos.vec -bg neg.txt -numPos 200 -numNeg 100 -numStages 10 -w 24 -h 24
There are many arguments here to talk about.
- The
-numPosneeds to be some amount lower than the number of samples created by createsamples.- If you get errors that look like: Can not get new positive sample. Then you need to either lower your -numPos or lower the -minHitRate (default 0.995).
- A popular suggestion for
-numNegis to use half of-numPos. This is a good place to start, but you'll want to try many different values here. Using twice the number of negative to positive, or even more, can sometimes yield better results. - The
-wand-hmust match what was used for the createsamples step. - The more
-numStagesthe longer it will take to train. Too many and you might overtrain.- If you run initially with 10 stages, you can later run it again with more stages, like 30, and it will pick up from where it left off. As you get deeper into the stages, each one takes longer.
When you run the training, you'll get some useful insights in the terminal output. In the results table, HR means hit rate (the number of positive examples that were correctly identified), FA is false alarm (the number of negative samples that were incorrectly identified), and N = weak layer number (which Haar cascade layer the rates are for). A really small Neg acceptanceRatio can sometimes be an indication of overtraining, ie. if it has e-06. We'll talk more about overtraining in a little bit.
Now's a good time to explain what goes on when training a machine learning model.
- The trainer will show your model a random image: either one of the objects you drew a box around, or a random cutout from one of your negative images.
- The model will try to predict whether this image is from the positive or negative pile.
- The trainer will tell your model whether that prediction was right or wrong.
- The model will make adjustments to itself based on whether it was right or wrong.
- Then the cycle repeats, thousands of times.
This process is sort of like learning with flashcards when you were a kid. Over time, with more an more training, the model begins to identify patterns that help it make more accurate predictions.
When opencv_traincascade.exe finishes, you'll find your trained model in cascade/cascade.xml. We can now use this model to find objects in new screenshots. Let's re-use the Vision class to draw the object detection rectangles on our output.
# main.py
wincap = WindowCapture('Albion Online Client')
# load an empty Vision class
vision_limestone = Vision(None)

# load the trained model
cascade_limestone = cv.CascadeClassifier('cascade/cascade.xml')

loop_time = time()
while(True):

    # get an updated image of the game
    screenshot = wincap.get_screenshot()

    # do object detection
    rectangles = cascade_limestone.detectMultiScale(screenshot)

    # draw the detection results onto the original image
    detection_image = vision_limestone.draw_rectangles(screenshot, rectangles)

    # display the images
    cv.imshow('Matches', detection_image)
You can see the code to use a model is really simple! We just load our model file with cv.CascadeClassifier() and then call detectMultiScale(), giving it a fresh screenshot, to get a list of rectangles that bound the objects we've trained our model to detect.
Try it out to see what kind of results you get!
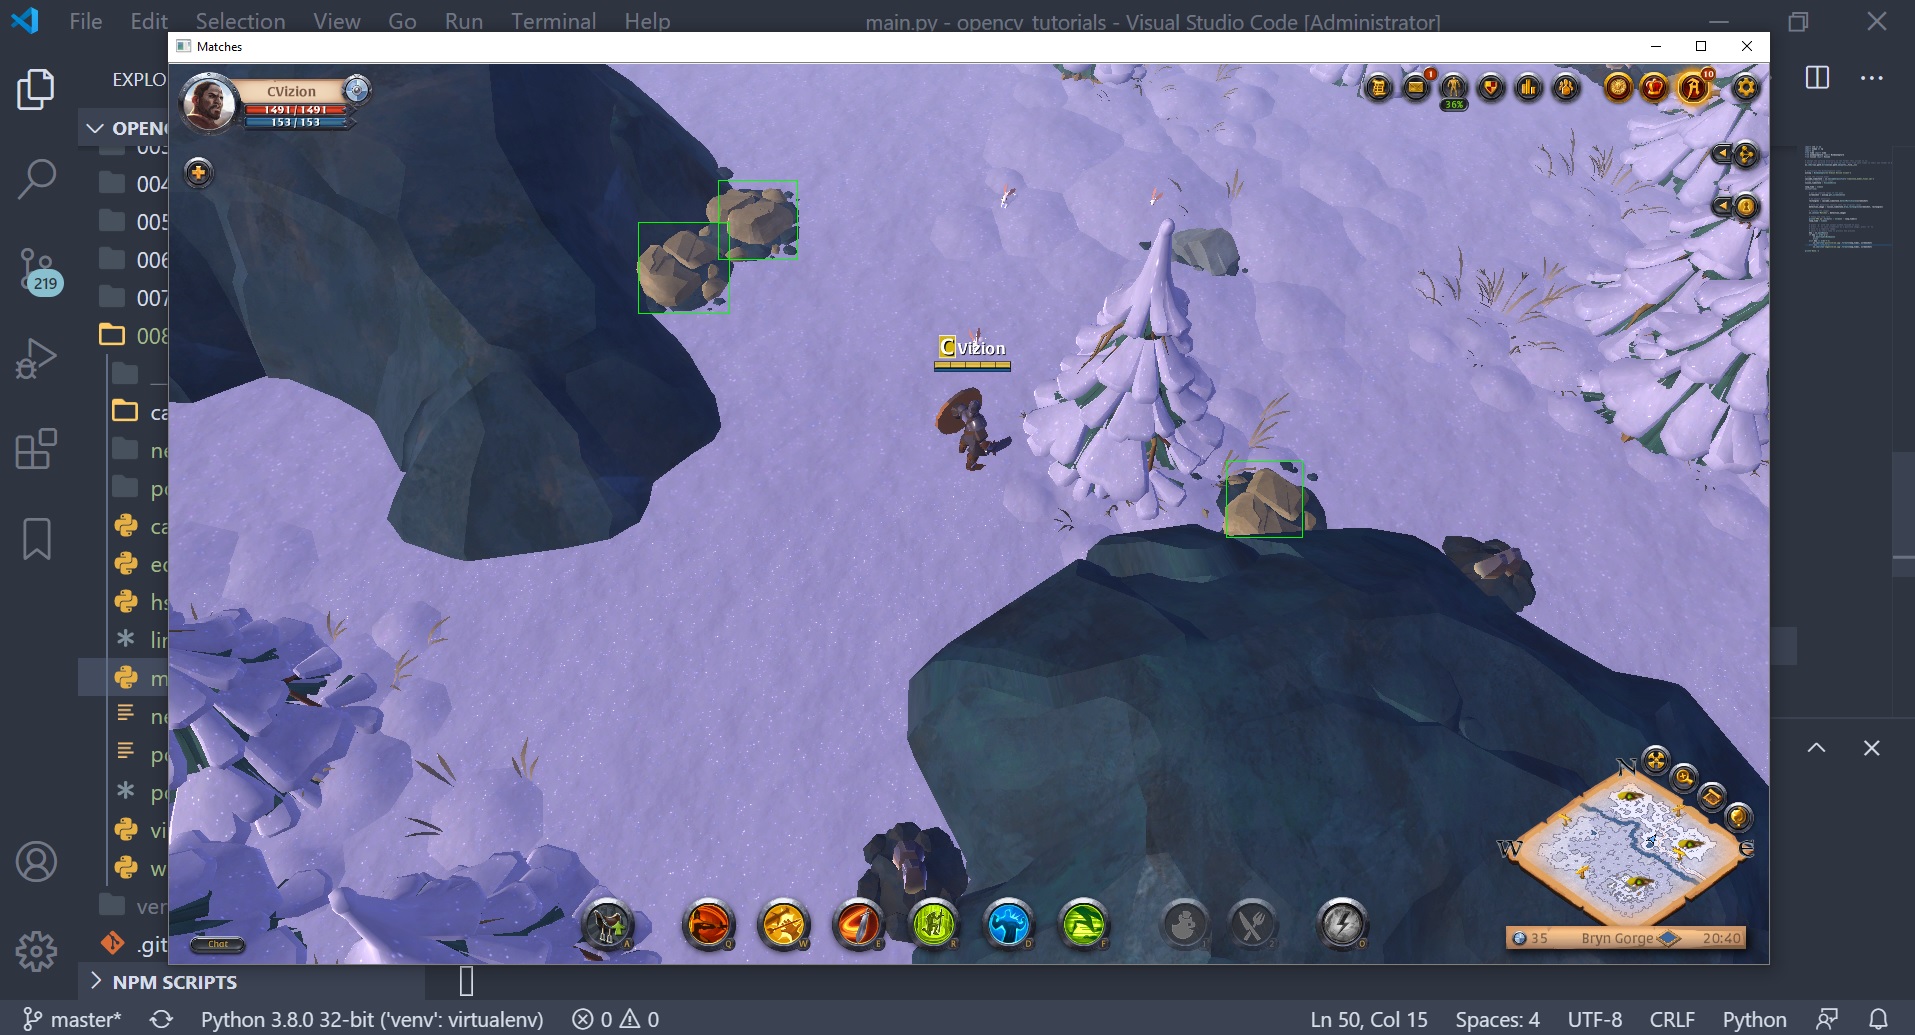
In my case the classifier works decent, but I'm seeing a lot of false positives. I think I could have expected this since it trained very fast (only 2 minutes for 10 layers).
Now it becomes a game of adjusting the parameters given to opencv_createsamples.exe and opencv_traincascade.exe to get the most out of our training data. When starting a new training, you need to clear out the cascade folder, or save the new training to a new folder. To test how good our classifier is, we'll do it manually by booting up the game and seeing how we feel about the results. This is a subjective measurement, but it'll give us some sense of what parameter values work better than others.
Different parameters will work best in different situations, so you need to adjust these to find the best setup for your project/problem. Here are some tips to guide you:
- You can get faster training by using the
-precalcValBufSizeand-precalcIdxBufSizeparameters. Keep in mind that these combined values should not exceed your available system memory. - If you have too many false positives: add more
-numNegand train for more-numStages. - If you valid objects are being missed: you overfit your data so try reducing the number of stages.
Overtraining or overfitting means you trained your classifier to only recognize the exact images you have in your positive folder, so it's not going to generalize well to any slightly different images. This is a common problem in machine learning. Keep in mind that the best solution isn't always more or longer training. You may get improvements by actually reducing the number of training stages. Your model will eventually hit the limit of what can be achieved with your dataset, and the only way to improve from there is with more and better training data.
After training a couple dozen different models, these were the arguments that I thought worked best in my case:
$ C:/Users/Ben/learncodebygaming/opencv/build/x64/vc15/bin/opencv_traincascade.exe -data cascade/ -vec pos.vec -bg neg.txt -precalcValBufSize 6000 -precalcIdxBufSize 6000 -numPos 200 -numNeg 1000 -numStages 12 -w 24 -h 24 -maxFalseAlarmRate 0.4 -minHitRate 0.999
I decided I'd rather lean towards more false positives, rather than more misses, because in my bot script I'll be able to hover over the potential matches and confirm whether it's a limestone deposit or not by looking at the tooltip.
That should be everything you need to know to get started with Cascade Classifiers. As you saw, programming-wise it's not too complicated, but gathering up all that data can be tedious, and as you get more and more data the training will take longer and longer. But that's the name of the game in data science.
I think a project like this is a really good place to get started with Machine Learning, because you get an understanding of the practical application first, And then if you're interested in diving deeper into the theoretical stuff, you'll have some context for understanding the overall picture of what you're trying to achieve.
In the final part of this saga, I'll be bringing together everything we've talked about and combine it with automated mouse and keyboard inputs to make a basic resource gathering bot. It's going to be a rather unpolished bot, but I'll give you enough where you should be able to get started on your own automation project.
How To Build a Bot with OpenCV
 My name is Ben and I help people learn how to code by gaming.
I believe in the power of project-based learning to foster a deep understanding and joy in the craft of
software development.
On this site I share programming tutorials, coding-game reviews, and project ideas for you to explore.
My name is Ben and I help people learn how to code by gaming.
I believe in the power of project-based learning to foster a deep understanding and joy in the craft of
software development.
On this site I share programming tutorials, coding-game reviews, and project ideas for you to explore.