by playing video games.
OpenCV Object Detection in Games
OpenCV Object Detection in Games Python Tutorial #1
OpenCV is an open source computer vision library with hundreds of functions for processing and understanding images. In this tutorial, I'm going to show you how to get started with OpenCV in Python by using it to find an image inside another image. This simple form of object detection will be a good starting point before we move on to more advanced image recognition techniques.
Links
GitHub repo: https://github.com/learncodebygaming/opencv_tutorials
OpenCV documentation: https://docs.opencv.org/4.2.0/
Official template matching tutorial: https://docs.opencv.org/4.2.0/d4/dc6/tutorial_py_template_matching.html
The quickest way to get started with OpenCV is: pip install opencv-python
Once installed, you can use the library by importing cv2. Numpy is used extensively when working with OpenCV data, so the top of your Python files will look like this:
import cv2 as cv
import numpy as np
That's all there is for setup. Now let's grab an image we want to process. I'm going to be using this screenshot from Albion Online, but any screenshot will do.
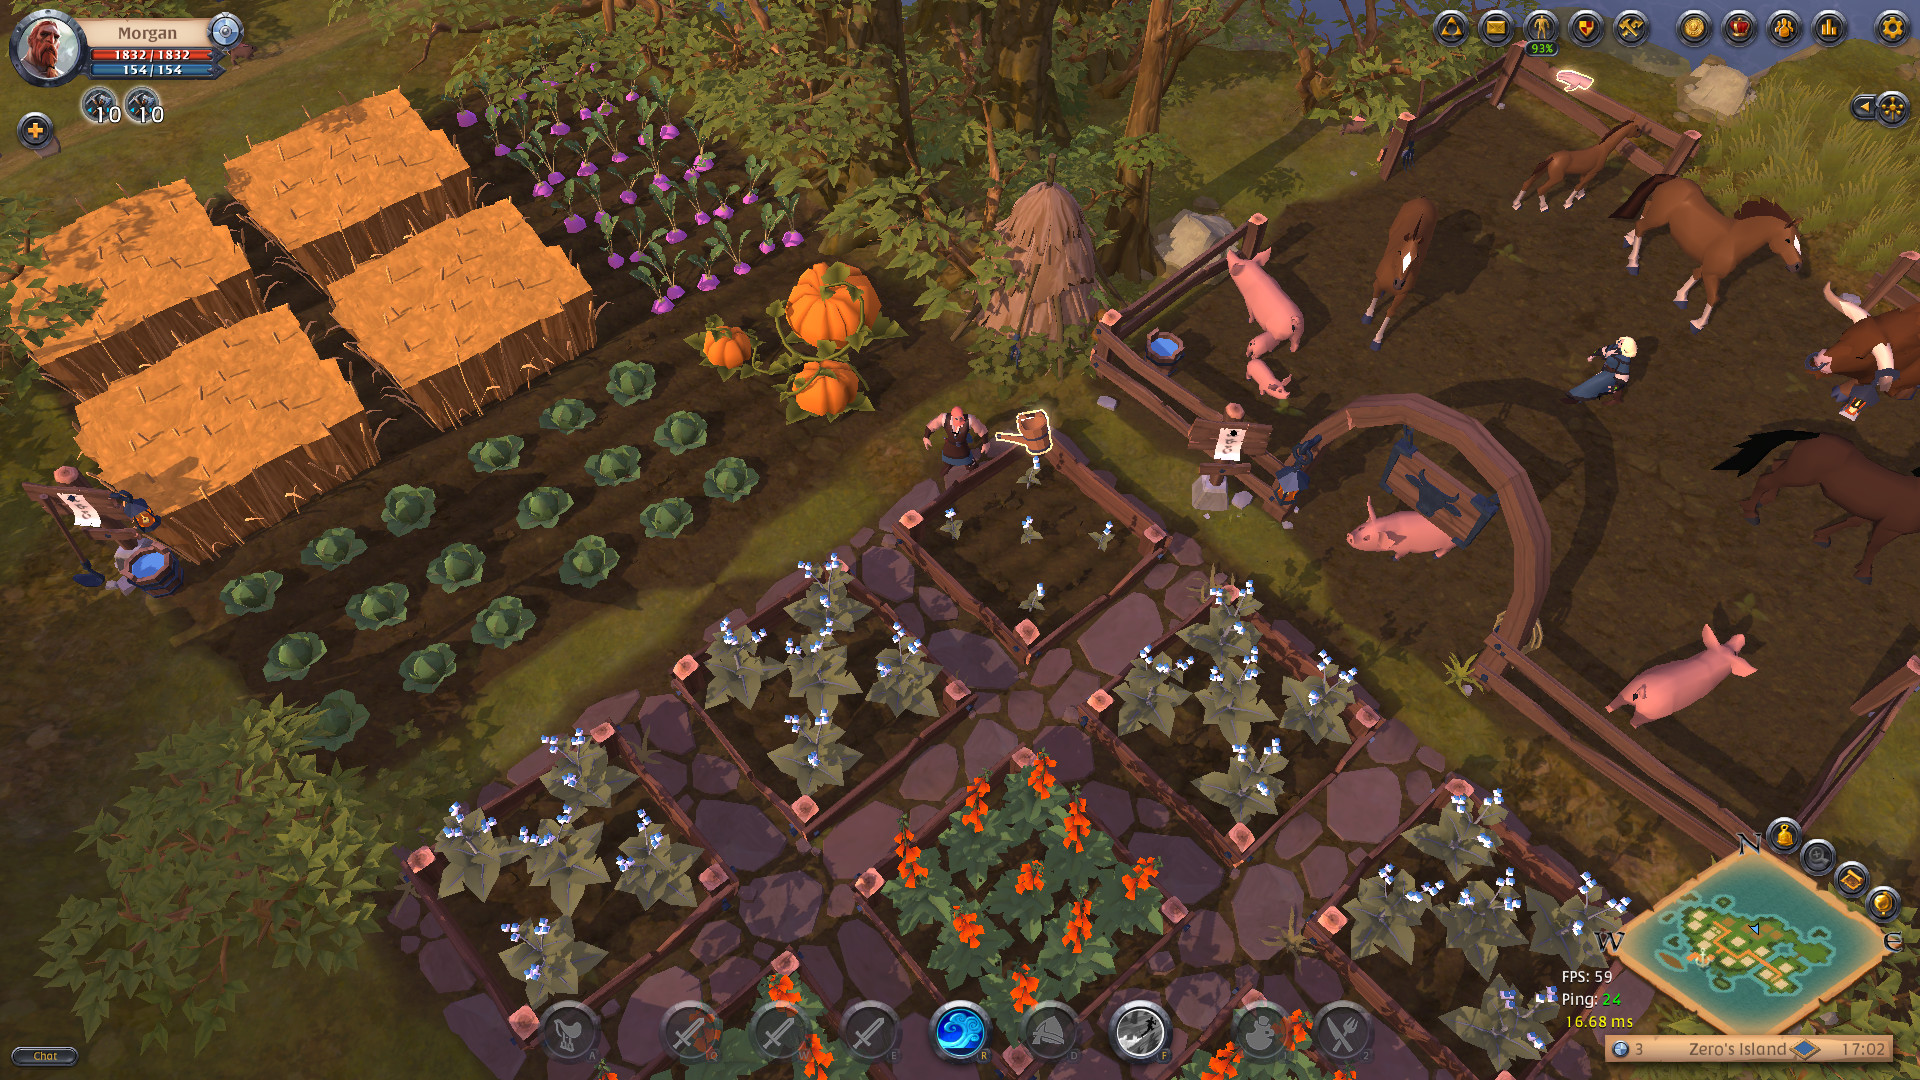
What we're going to do is crop out a small section from our screenshot, save that as a separate image file, and then we're going to use OpenCV to find the position of the smaller image inside our entire screenshot. From my screenshot, I'll crop out one of the cabbages.

The OpenCV function we'll be focusing on is called matchTemplate(). In the documentation, we can see we're going to give this function an image to search over, an image to search for, and a method type for doing the comparison. And we'll end up with a result array. You'll want to experiment with the different comparison methods to see what works best for your use-case.
Alright, let's write some code. The first thing we want to do is load our image files.
haystack_img = cv.imread('albion_farm.jpg', cv.IMREAD_UNCHANGED)
needle_img = cv.imread('albion_cabbage.jpg', cv.IMREAD_UNCHANGED)
The "haystack" image is our screenshot, and we'll be search that for the "needle" image we cropped out. In imread() the first parameter is the image file path, and the second parameter is a flag that allows us to do some pre-processing when loading the images. In this case, we're loading them in unchanged.
Now that we have our images loaded, we can go ahead and call matchTemplate(). I've had good luck using the TM_CCOEFF_NORMED comparison algorithm.
result = cv.matchTemplate(haystack_img, needle_img, cv.TM_CCOEFF_NORMED)
We can quickly see the results from matchTemplate() by displaying that data with imshow().
cv.imshow('Result', result)
cv.waitKey()
In imshow(), the first parameter is the window name and the second is the image we want to show. I've also called waitKey() to pause our script while we review the image. Without this, our script would quickly close before we could see the image. Pressing any key on the keyboard will trigger waitKey() to stop waiting, thus ending our script.
The result I get looks like this:
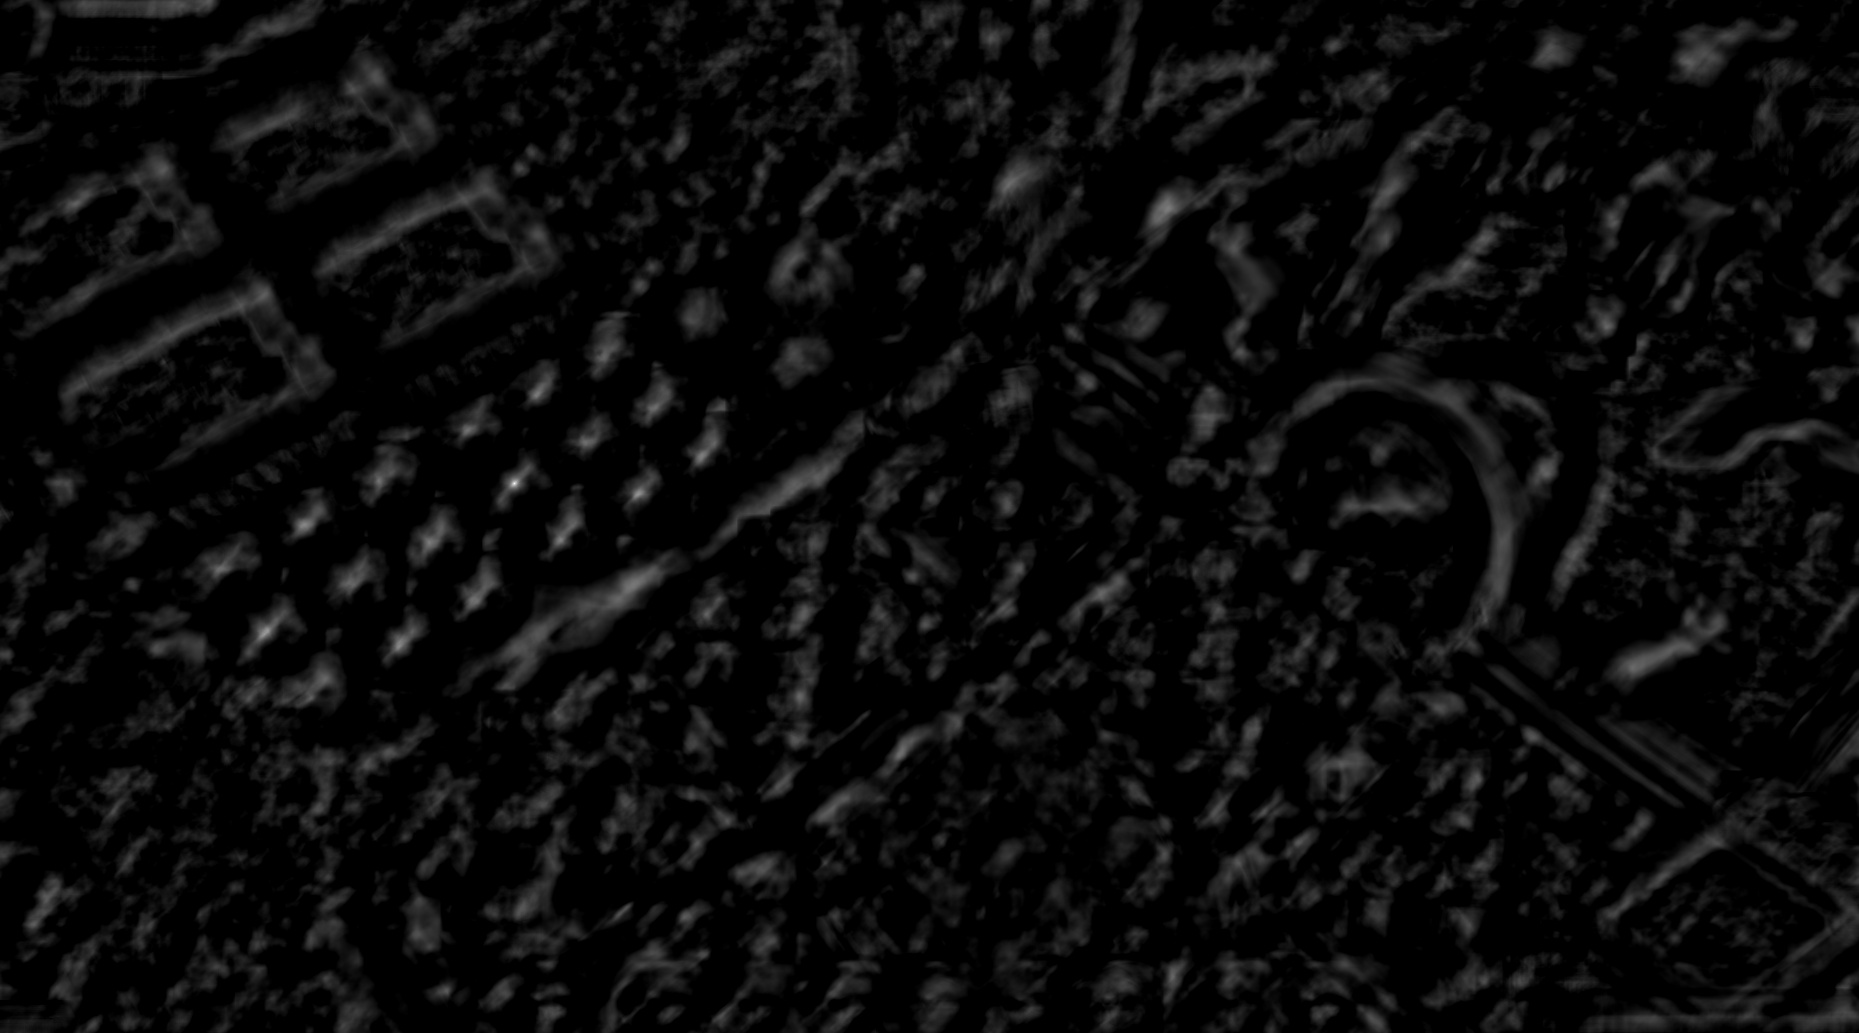
In this result image, the bright white pixels represent the positions that best match the cropped image. The black pixels are the worst matches. Note that these best match positions correspond with the upper left corner of where you'd place the needle image.
Now that we've visualized the results of matchTemplate(), let's get those best match coordinates. We can do that using minMaxLoc().
min_val, max_val, min_loc, max_loc = cv.minMaxLoc(result)
print('Best match top left position: %s' % str(max_loc))
print('Best match confidence: %s' % max_val)
The minMaxLoc() function returns four values. First are the confidence values for the worst and best matches, on a scale from 0 to 1. These are how black or how white the darkest/brightest pixels are in our result image, where 0 would be perfect black and 1 would be perfect white. The last two values minMaxLoc() returns are the positions of those worst/best match pixels in the form of an (X,Y) tuple.
For every needle image that we give matchTemplate(), we will always get back some values from minMaxLoc(), even if that cropped image appears nowhere in the haystack. We can tell when we didn't find a good match because the max confidence value will be low. How low is too low depends on the images you're working with and what you're trying to achieve.
threshold = 0.8
if max_val >= threshold:
    print('Found needle.')
else:
    print('Needle not found.')
You'll want to decide if you actually found a good enough match or not depending on some threhold for the max confidence value.
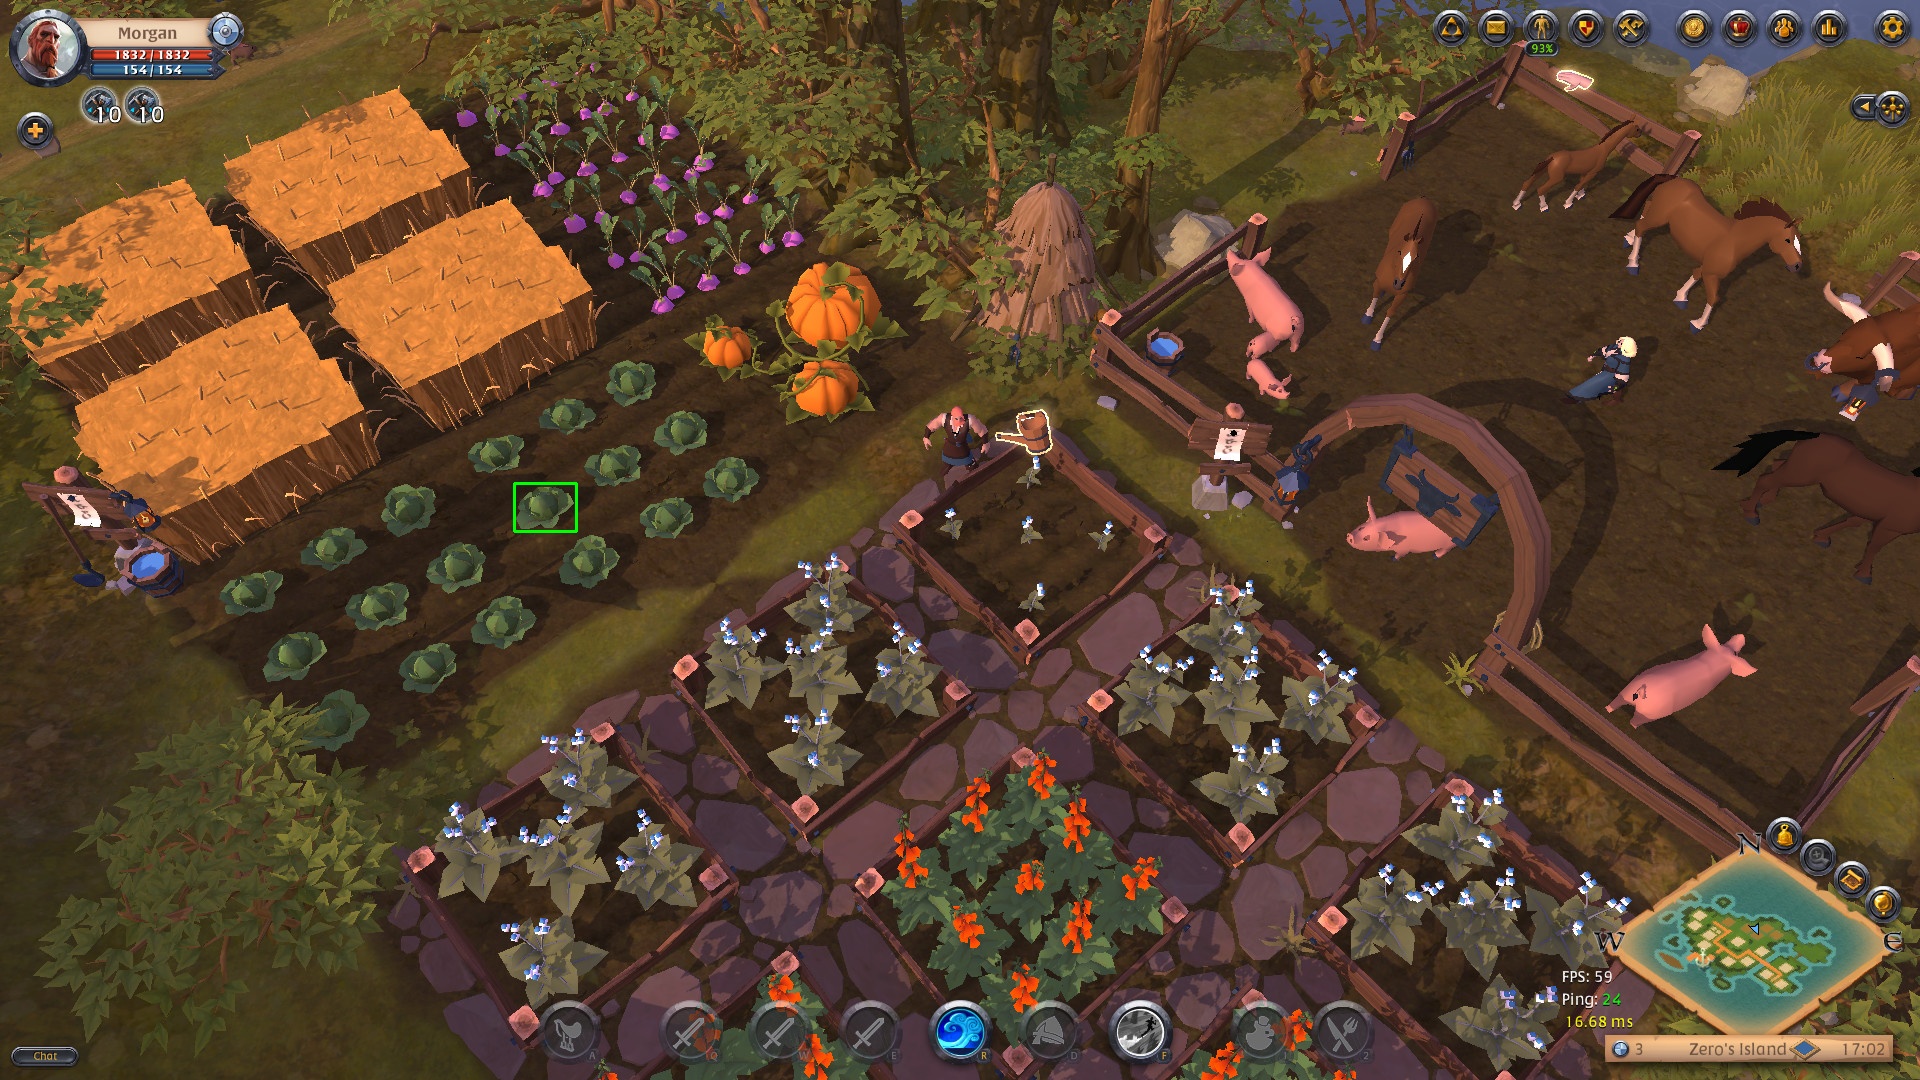
Now that we've found a good match, let's outline where we found it in the haystack image. We can do that using OpenCV's rectangle() function.
cv.rectangle(haystack_img, top_left, bottom_right, color=(0, 255, 0), thickness=2, lineType=cv.LINE_4)
In rectangle() the first parameter is the image to draw on, second is the top left corner of the rectangle to draw, then the bottom right corner of the rectangle. The fourth parameter is the color of the rectangle in BGR format. Next is the thickness of the lines in pixels. And finally we choose a line type, where LINE_4 will be a outline of a rectangle like we want.
Now we just need to assign top_left the value of max_loc, and calculate the bottom right using the size of the needle image. With OpenCV images, you can get the dimensions via the shape property.
needle_w = needle_img.shape[1]
needle_h = needle_img.shape[0]
top_left = max_loc
bottom_right = (top_left[0] + needle_w, top_left[1] + needle_h)
Finally we can output our final result.
cv.imshow('Result', haystack_img)
cv.waitKey()
cv.imwrite('result.jpg', haystack_img)
I've included imwrite() to save our output image to a file. And here it is:
From here there's tons of directions you could go with OpenCV. Hopefully this tutorial has given you a good start. I'm going to keep making more OpenCV tutorials, so let me know if there's something specific you'd like me to cover!
Here's what the complete code looks like:
import cv2 as cv
import numpy as np
import os


# Change the working directory to the folder this script is in.
# Doing this because I'll be putting the files from each video in their own folder on GitHub
os.chdir(os.path.dirname(os.path.abspath(__file__)))

# Can use IMREAD flags to do different pre-processing of image files,
# like making them grayscale or reducing the size.
# https://docs.opencv.org/4.2.0/d4/da8/group__imgcodecs.html
haystack_img = cv.imread('albion_farm.jpg', cv.IMREAD_UNCHANGED)
needle_img = cv.imread('albion_cabbage.jpg', cv.IMREAD_UNCHANGED)

# There are 6 comparison methods to choose from:
# TM_CCOEFF, TM_CCOEFF_NORMED, TM_CCORR, TM_CCORR_NORMED, TM_SQDIFF, TM_SQDIFF_NORMED
# You can see the differences at a glance here:
# https://docs.opencv.org/master/d4/dc6/tutorial_py_template_matching.html
# Note that the values are inverted for TM_SQDIFF and TM_SQDIFF_NORMED
result = cv.matchTemplate(haystack_img, needle_img, cv.TM_CCOEFF_NORMED)

# You can view the result of matchTemplate() like this:
#cv.imshow('Result', result)
#cv.waitKey()
# If you want to save this result to a file, you'll need to normalize the result array
# from 0..1 to 0..255, see:
# https://stackoverflow.com/questions/35719480/opencv-black-image-after-matchtemplate
#cv.imwrite('result_CCOEFF_NORMED.jpg', result * 255)

# Get the best match position from the match result.
min_val, max_val, min_loc, max_loc = cv.minMaxLoc(result)
# The max location will contain the upper left corner pixel position for the area
# that most closely matches our needle image. The max value gives an indication
# of how similar that find is to the original needle, where 1 is perfect and -1
# is exact opposite.
print('Best match top left position: %s' % str(max_loc))
print('Best match confidence: %s' % max_val)

# If the best match value is greater than 0.8, we'll trust that we found a match
threshold = 0.8
if max_val >= threshold:
    print('Found needle.')

    # Get the size of the needle image. With OpenCV images, you can get the dimensions
    # via the shape property. It returns a tuple of the number of rows, columns, and
    # channels (if the image is color):
    needle_w = needle_img.shape[1]
    needle_h = needle_img.shape[0]

    # Calculate the bottom right corner of the rectangle to draw
    top_left = max_loc
    bottom_right = (top_left[0] + needle_w, top_left[1] + needle_h)

    # Draw a rectangle on our screenshot to highlight where we found the needle.
    # The line color can be set as an RGB tuple
    cv.rectangle(haystack_img, top_left, bottom_right,
                    color=(0, 255, 0), thickness=2, lineType=cv.LINE_4)

    # You can view the processed screenshot like this:
    #cv.imshow('Result', haystack_img)
    #cv.waitKey()
    # Or you can save the results to a file.
    # imwrite() will smartly format our output image based on the extension we give it
    # https://docs.opencv.org/3.4/d4/da8/group__imgcodecs.html#gabbc7ef1aa2edfaa87772f1202d67e0ce
    cv.imwrite('result.jpg', haystack_img)

else:
    print('Needle not found.')
Thresholding with Match Template

Grouping Rectangles into Click Points

Fast Window Capture
 My name is Ben and I help people learn how to code by gaming.
I believe in the power of project-based learning to foster a deep understanding and joy in the craft of
software development.
On this site I share programming tutorials, coding-game reviews, and project ideas for you to explore.
My name is Ben and I help people learn how to code by gaming.
I believe in the power of project-based learning to foster a deep understanding and joy in the craft of
software development.
On this site I share programming tutorials, coding-game reviews, and project ideas for you to explore.